Introduction
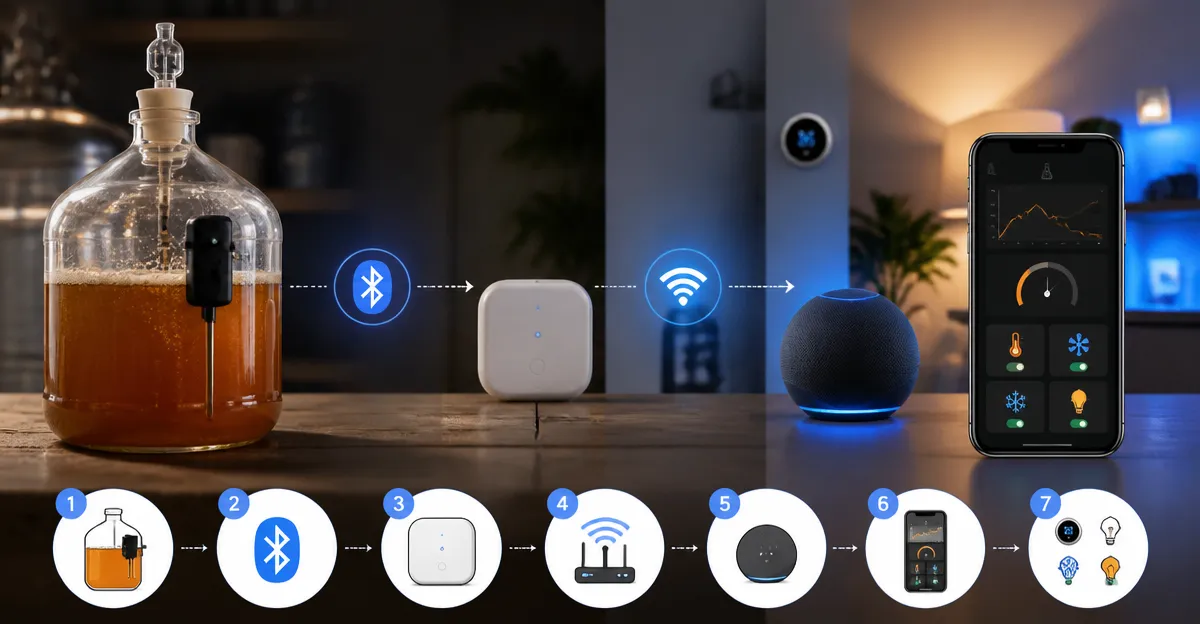
One will discover how to integrate a fermentation monitor with a smart home ecosystem, enabling remote temperature tracking and automated alerts. This guide explains each phase of the process, from preparing the fermentation vessel to configuring voice‑assistant routines. By following the instructions, one can reduce the risk of off‑flavor development and maintain optimal yeast activity without constant manual checks. The value of this knowledge lies in improved consistency, time savings, and the ability to monitor fermentations while away from home.
The modern homebrewer often seeks data‑driven methods to refine recipes, and a connected monitor provides real‑time metrics that can be logged and analyzed. When paired with a smart hub, temperature spikes trigger notifications on a smartphone, and temperature‑controlled heating pads can be activated automatically. This article presents a professional workflow that balances technical precision with practical accessibility for an intermediate audience.
What You’ll Need
- Masontops Mason Jar Fermenting Kit – $49.99, rating 4.7/5.0 (735 reviews). This kit supplies air‑lock lids, glass weights, and a tamper for small‑mouth mason jars, creating a reliable fermentation vessel.
- Digital fermentation monitor with Bluetooth or Wi‑Fi capability (e.g., a generic smart temperature sensor).
- Wi‑Fi network with stable internet access.
- Smart home hub or voice‑assistant device (Amazon Echo, Google Nest, etc.).
- Optional: Smart plug for temperature‑controlled heating pad.
Step 1: Prepare the Fermentation Vessel
Begin by selecting a clean, food‑grade mason jar that matches the capacity of the intended batch. One should sterilize the jar by washing it with hot, soapy water and rinsing thoroughly, then allowing it to air dry. The Masontops Mason Jar Fermenting Kit provides four Pickle Pipe Airlock Tops that seal the jar while allowing carbon dioxide to escape without admitting oxygen, which is essential for anaerobic fermentation.
Place the appropriate weight from the kit—one of the Pickle Pebble Infinity Glass Weights—on top of the vegetable mass to keep it submerged in brine. The weight prevents surface exposure to air, reducing the likelihood of mold formation. Use the Acacia Pickle Packer Vegetable Tamper included in the kit to press the produce firmly, ensuring an even distribution of salt and brine throughout the jar.
After filling the jar with the prepared wort or vegetable mash, secure the air‑lock lid from the kit. The airlock’s waterless self‑burping design releases excess gas while maintaining a sealed environment, eliminating the need for frequent manual burping. This preparation creates a stable base for the digital monitor to record accurate temperature data.
Step 2: Install the Fermentation Monitor
Select a fermentation monitor that can be attached to the outside of the mason jar without compromising the seal. Many monitors feature a magnetic backing or adhesive pad; one should position the sensor against the glass where it will have direct contact with the liquid inside. Ensure the sensor does not obstruct the air‑lock mechanism supplied by the Masontops Mason Jar Fermenting Kit, as interference could allow oxygen ingress.
Power the monitor according to the manufacturer’s instructions, typically by inserting a coin cell battery or connecting to a USB power source. Verify that the indicator LED or display shows a stable connection, indicating that the sensor is ready to transmit data. This step is critical because an improperly attached monitor may record inaccurate temperatures, leading to misguided adjustments.
Step 3: Connect the Monitor to Wi‑Fi
Open the companion mobile application for the monitor on a smartphone or tablet. One should navigate to the device‑addition screen, select the Wi‑Fi network, and enter the password. The application will guide the user through a pairing process that links the sensor to the cloud service, enabling remote access.
After successful connection, test the data stream by viewing the current temperature reading in the app. Confirm that the value aligns with a manual thermometer placed in the same jar; a variance of less than one degree Celsius indicates proper calibration. Maintaining a reliable Wi‑Fi link ensures that alerts are delivered promptly to the smart home hub.
Step 4: Integrate with Smart Home Assistant
Log into the smart home platform (e.g., Alexa or Google Home) and add the fermentation monitor as a new device. Most platforms support third‑party integrations via skill or action enablement; one should search for the monitor’s brand name and enable the corresponding skill.
Once the device appears in the smart home dashboard, create a routine that triggers a notification when the temperature falls outside the target range (for example, below 18 °C or above 22 °C for ale fermentation). Optionally, link a smart plug that powers a temperature‑controlled heating pad, configuring the routine to turn the pad on when the temperature drops below the lower threshold.
This automation reduces the need for manual intervention, as the system will automatically adjust environmental conditions and inform the brewer via a smartphone alert. The integration also allows one to query the current temperature using voice commands, such as “Hey Alexa, what is the fermentation temperature?”
Step 5: Calibrate and Begin Monitoring
Before commencing the primary fermentation, calibrate the monitor by immersing it in a water bath set to a known temperature (for instance, 20 °C). Adjust the calibration offset in the app until the displayed temperature matches the water bath reading. Calibration ensures that subsequent readings reflect the true temperature inside the jar.
Start the fermentation by adding yeast to the prepared wort or vegetable mash, then close the jar with the air‑lock lid from the Masontops Mason Jar Fermenting Kit. Monitor the temperature trend over the first 24 hours to verify that the environment remains stable. If the temperature deviates, adjust the smart plug‑controlled heating pad or relocate the jar to a more suitable location.
Continue to observe the data through the mobile app and smart home dashboard, noting any fluctuations that may indicate fermentation activity spikes. Recording this information in a brewing log enables one to refine future recipes and improve overall consistency.
Tips & Pro Tips
- Place the jar in a location with minimal temperature swings, such as a basement or insulated cabinet, to reduce the workload on the heating pad.
- Use the recipe book included in the Masontops Mason Jar Fermenting Kit for proven brine ratios and fermentation timelines, especially when experimenting with new vegetables.
- Enable push notifications on the mobile app to receive instant alerts, preventing prolonged exposure to undesirable temperatures.
- Periodically clean the air‑lock tops with a mild bleach solution to prevent biofilm buildup, which can affect gas release.
- If the monitor loses Wi‑Fi connectivity, restart the router and re‑pair the device using the app’s troubleshooting guide.
Troubleshooting
Problem: Temperature reading remains constant despite visible fermentation activity.
Solution: Verify that the sensor is in direct contact with the glass and not insulated by a protective sleeve. Re‑position the monitor if necessary, and ensure the battery is fully charged.
Problem: Smart home routine does not trigger when temperature exceeds limits.
Solution: Check that the monitor is correctly linked to the smart home account and that the temperature thresholds are set within the allowed range of the platform. Re‑enable the skill or action if the link appears broken.
Conclusion
One has now learned how to prepare a fermentation vessel, install a digital monitor, connect it to Wi‑Fi, integrate it with a smart home assistant, and calibrate the system for accurate tracking. By employing the Masontops Mason Jar Fermenting Kit alongside a reliable monitor, the homebrewer gains precise control over temperature, leading to consistent flavor profiles and reduced risk of spoilage.
The automation described in this guide empowers one to focus on creative aspects of brewing while technology handles routine monitoring. Continued use of the data logs will enable refinement of recipes and deeper understanding of fermentation dynamics.
Products Mentioned in This Guide
Frequently Asked Questions
How do I connect a fermentation monitor to my smart home system?
Pair the monitor via Wi‑Fi or Bluetooth, then add it as a device in your smart hub’s app and enable temperature reporting.
Which smart home platforms are compatible with fermentation monitors?
Most monitors work with Amazon Alexa, Google Assistant, and Apple HomeKit, but check the product specs for exact compatibility.
Can I receive temperature alerts on my phone during fermentation?
Yes, configure notification rules in the hub app so temperature spikes trigger push alerts to your smartphone.
How can I automate heating pads using a fermentation monitor?
Create a routine that turns on a smart plug controlling the heating pad when the monitor reports temperatures below your target range.
What are the main benefits of a connected fermentation monitor for homebrewers?
It provides real‑time data, reduces off‑flavor risk, saves time, and lets you monitor fermentations remotely for consistent results.