How to Convert a Mini Fridge into a Fermentation Chamber: Step‑by‑Step DIY Guide for Homebrewers (Easy, Low‑Cost Temperature Control)
Introduction
Homebrewers often require a stable, cool environment to ferment beer, cider, or kombucha. Converting a compact refrigerator into a fermentation chamber provides precise temperature control without the expense of a dedicated unit. This guide explains how to repurpose a BANGSON Mini Fridge into an efficient fermentation chamber. Readers will learn the tools, steps, and best practices needed to achieve consistent results.
The process emphasizes low‑cost modifications, using readily available components that complement the fridge’s existing features. By the end of the tutorial, one will have a sealed, temperature‑regulated space suitable for a variety of fermentations. The guide remains valuable even for those who prefer to use alternative equipment, as each step includes optional methods.
What You’ll Need
- One BANGSON Mini Fridge with Freezer (3.2 CU.FT, $199.49, 4.3/5 rating)
- Digital temperature controller (e.g., Inkbird ITC‑308)
- Thermometer or temperature probe compatible with the controller
- Silicone gasket or weather‑stripping to improve seal
- Small fan for air circulation (optional but recommended)
- Humidity control device (e.g., Boveda packs) for specific fermentations
- Utility knife, screwdriver set, and adhesive tape
Step‑by‑Step Instructions
Step 1: Empty and Clean the Mini Fridge
Begin by removing all removable shelves, the crisper drawer, and any accessories from the interior of the BANGSON Mini Fridge. Wash the interior surfaces with a mild detergent and rinse thoroughly to eliminate residual odors that could affect fermentation. Dry the cavity completely, paying special attention to corners where moisture can accumulate.
Because the fridge already includes a reversible door and adjustable legs, it can be positioned on a stable workbench without additional modifications. The low‑noise compressor (under 38 dB) ensures that the fermentation process will not be disturbed by audible vibrations.
Step 2: Improve the Seal and Insulation
Apply silicone gasket material around the door perimeter to reduce temperature fluctuations. Cut the gasket to fit the existing door seal, then press it firmly into place. This simple upgrade leverages the fridge’s existing insulation, extending the cooling efficiency and reducing energy consumption (the unit uses only 0.88 kWh per day).
For added insulation, attach a thin sheet of reflective foil to the interior back wall using heat‑resistant tape. This reflects cold air back into the chamber, maintaining a more uniform temperature profile.
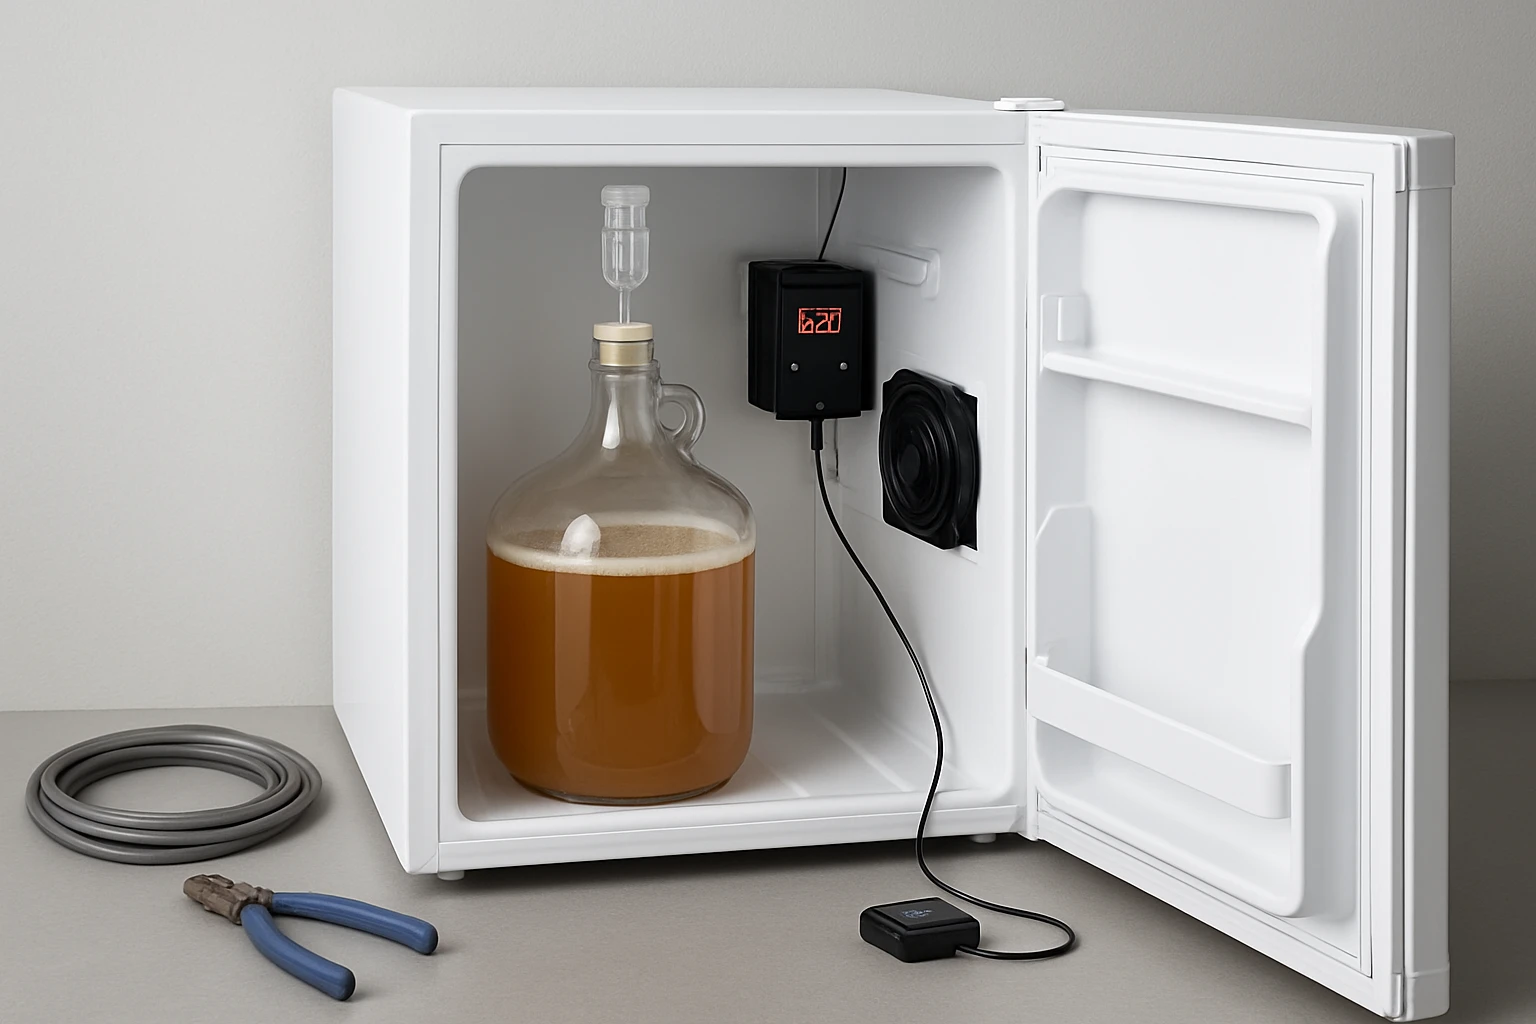
Step 3: Install a Digital Temperature Controller
Connect a digital temperature controller to the fridge’s power cord, using the controller’s heating and cooling outputs to regulate the compressor. Place the temperature probe inside the chamber at the height where the fermenting vessels will sit. Set the desired fermentation temperature (typically 55‑68 °F for ales) on the controller.
The controller will cycle the compressor on and off, maintaining the setpoint within a narrow range. This method is far more reliable than manual thermostat adjustments, which often lead to temperature swings that can stress yeast.
Step 4: Add Air Circulation
Install a small, low‑profile fan on the interior wall to promote even airflow. Position the fan so that it circulates air without blowing directly on the fermenting containers, preventing localized cooling or heating. Even airflow helps the temperature controller achieve a stable environment more quickly.
Because the fridge’s interior LED light produces minimal heat, the fan’s power consumption is negligible compared to the compressor’s draw.
Step 5: Configure Humidity Control (Optional)
Some fermentations, such as sour beers or kombucha, benefit from controlled humidity. Place a few Boveda humidity packs on a shelf to maintain a relative humidity of 60‑70 %. The packs release or absorb moisture as needed, creating a balanced microclimate without requiring a separate humidifier.
Monitor humidity with a digital hygrometer placed near the fermenting vessel. Adjust the number of packs based on the readings, ensuring that the environment does not become too damp, which could encourage mold growth.
Step 6: Arrange Fermentation Vessels
Position your fermentation carboys or buckets on the removable shelves, ensuring they are stable and not touching the freezer compartment. The fridge’s adjustable glass shelves can be removed to create a single, open space for larger vessels. Use the crisper drawer as a storage area for cleaning supplies or spare yeast packets.
Leave a small gap between the vessel and the freezer wall to allow cold air to circulate freely. This arrangement maximizes the effective cooling volume while preserving the convenience of the built‑in freezer for storing yeast starters.
Step 7: Test the System
Before adding any brew, run the chamber empty for at least two hours to verify that the temperature controller maintains the setpoint. Observe the compressor cycles and ensure the fan operates continuously. Record temperature data using the controller’s logging feature, if available.
If temperature deviations exceed ±2 °F, revisit the gasket seal or adjust the controller’s hysteresis settings. Minor tweaks at this stage prevent larger issues during actual fermentation.
Tips & Pro Tips
- Use a magnetic thermometer strip on the interior wall for quick visual checks without opening the door.
- Place a small tray of ice packs in the freezer compartment to boost cooling capacity during hot summer months.
- Label each shelf with the intended temperature range to avoid accidental placement of temperature‑sensitive brews.
- Regularly clean the interior to prevent mold and odor buildup, especially after long fermentation cycles.
Troubleshooting
Problem: Temperature fluctuates more than 3 °F.
Solution: Verify that the gasket is properly seated and that the door closes fully. Check the temperature controller’s calibration and consider adding a second fan for improved air distribution.
Problem: Excessive condensation inside the chamber.
Solution: Reduce the humidity level by removing some Boveda packs or increasing ventilation. Ensure that the freezer compartment is not over‑filled, as this can raise internal humidity.
Conclusion
By following the steps outlined above, homebrewers can transform a compact BANGSON Mini Fridge into a reliable fermentation chamber. The conversion leverages the fridge’s energy‑efficient compressor, low noise level, and flexible interior design to create a stable, low‑cost environment for a variety of fermentations. Consistent temperature control, combined with optional humidity management, will improve yeast performance and overall brew quality. Readers are encouraged to experiment with the setup, fine‑tune the controller settings, and enjoy the benefits of professional‑grade fermentation at home.
Products Mentioned in This Guide
Frequently Asked Questions
What temperature range should I set for a fermentation chamber made from a mini fridge?
Aim for 55‑68 °F (13‑20 °C) for most beers, adjusting lower for lagers or higher for ales and kombucha.
Do I need a separate thermostat when converting a mini fridge?
Yes, an external temperature controller ensures precise regulation and prevents the fridge’s built‑in thermostat from cycling too often.
Can I use the freezer compartment for temperature control?
The freezer’s compressor is more efficient for lower temps; many builders install a thermostat probe inside the freezer to maintain a stable range.
What insulation upgrades improve temperature stability?
Add foam board or reflective insulation to the interior walls and seal gaps with weatherstripping to minimize heat loss and external fluctuations.
Is it safe to store multiple fermenters in a mini‑fridge chamber?
Yes, as long as you leave enough airflow between containers and avoid overloading the fridge beyond its rated capacity.