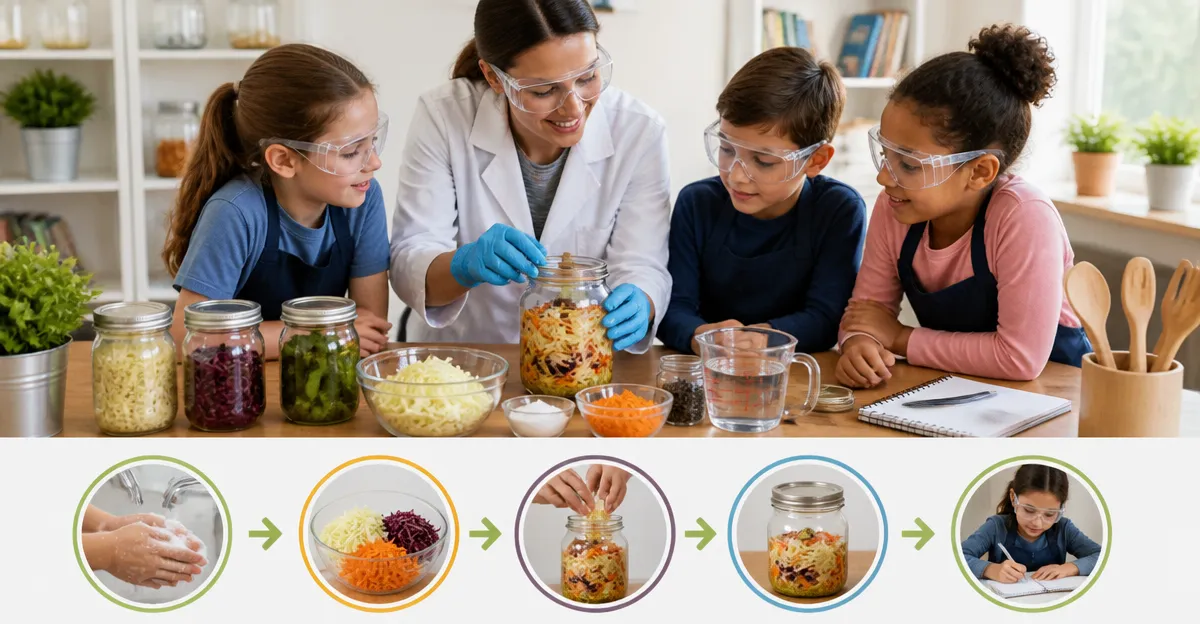
Introduction
In this guide, educators and parents will learn how to introduce fermentation concepts safely to children while fostering curiosity about microbiology and nutrition. The lesson plans combine scientific explanation, hands‑on activity, and clear safety protocols, ensuring that students gain confidence in handling living cultures. By the end of the session, participants will be able to identify beneficial bacteria, measure salt concentrations, and monitor pH changes without risk. This knowledge not only supports classroom science standards but also encourages healthy eating habits at home.
What You’ll Need
- Clean wide‑mouth mason jars (32 oz recommended)
- Food‑grade salt (non‑iodized)
- Fresh vegetables such as cabbage, carrots, or cucumbers
- Measuring tools (scale, spoons)
- Sanitized work surface and gloves
- Fermentation lids, airlocks, and weights (see product recommendations below)
All of the specialized fermentation tools can be sourced from the Amazon kits listed in the "Products Mentioned" section, but the activity can also be completed with basic kitchen supplies.
Step 1: Introduce the Science of Fermentation
Begin the lesson by explaining that fermentation is a natural process in which microbes convert sugars into acids, gases, or alcohol. Use a simple diagram to illustrate how lactic‑acid bacteria break down cabbage sugars to produce sauerkraut. Emphasize that these microbes are beneficial, improving digestion and boosting immune function. Ask students to brainstorm foods they have eaten that might have been fermented, reinforcing real‑world relevance.
Step 2: Gather Materials and Safety Gear
Having the right equipment reduces the risk of contamination and makes the process more enjoyable for young learners. The Masontops Mason Jar Fermentation Kit provides four wide‑mouth jars, airlock lids, glass weights, and a wooden tamper—all essential for a sealed, low‑oxygen environment. Features include a 9‑piece starter set, durable acacia wood tamper, and a printed recipe book; it is priced at $52.00 and holds a 4.8‑star rating from 4,774 reviews, indicating reliability for classroom use.
For smaller groups or limited budget, the IceFun 4‑Pack Mason Jar Fermentation Kit offers four 32 oz jars with plastic fermentation lids that eliminate rust concerns. Its dual‑channel airlocks and lead‑free glass weights ensure a stable environment, while the included labeling tags help students track progress. Priced at $39.99 with a 4.6‑star rating from 151 reviews, it is a cost‑effective alternative.
Both kits include clear instructions, but the Masontops kit is especially helpful for teachers who prefer a wooden tamper for hands‑on packing, whereas the IceFun kit’s plastic lids simplify cleaning between classes. Choose the kit that best matches your classroom size and cleaning schedule.
Step 3: Prepare the Fermentation Workspace
Designate a clean, well‑ventilated area where jars will sit undisturbed for several days. Lay down a disposable cutting board, and provide each student with gloves to prevent direct hand contact with raw vegetables. Before filling jars, rinse them with hot, soapy water and allow them to air‑dry; this step eliminates stray microbes that could compete with the desired bacteria.
If you are using the Masontops Small Mouth Fermentation Kit, the included Pickle Pipe airlock tops fit regular‑mouth jars, making them ideal for smaller batches or individual student projects. The kit costs $49.99, carries a 4.7‑star rating from 747 reviews, and includes glass weights that keep vegetables submerged, preventing mold formation.
Arrange the jars on a low shelf where they are visible but out of reach of pets. Label each jar with the student’s name and the date of inoculation using the tags from the IceFun kit or simple masking tape.
Step 4: Conduct a Simple Fermentation Activity
Guide students through chopping a head of cabbage into thin strips, then sprinkling 2 % salt by weight (approximately 1 ½ tablespoons per pound of cabbage). Explain that salt draws water out of the cells, creating a brine that protects the vegetables from harmful microbes while encouraging beneficial bacteria.
Allow each student to pack the salted cabbage into a jar, pressing firmly with the wooden tamper from the Masontops kit or the included plastic tamper from the IceFun kit. The goal is to eliminate air pockets; the glass weight will then sit on top of the vegetables, ensuring they remain fully submerged.
Secure the airlock lid and attach the airlock. The airlock releases carbon dioxide while preventing oxygen entry, a critical safety feature that stops spoilage. Close the lid and place the jar in the designated area for 3‑5 days, checking daily for bubbles and odor.
During observation, encourage students to record temperature, bubble activity, and any changes in smell or texture. This data collection reinforces scientific method skills and provides a basis for later discussion.
Step 5: Observe, Record, and Discuss Results
After the fermentation period, have students taste a small sample (with parental consent) and note the flavor profile. Guide the conversation toward how lactic‑acid bacteria transformed the cabbage, creating a tangy, probiotic‑rich food. Highlight the safety aspects that prevented spoilage: proper salinity, airtight environment, and submersion of vegetables.
If the fermentation was successful, demonstrate how to transition the jar from fermenting to storage using the same lid—simply remove the airlock and replace it with the silicone stopper. This dual‑function lid, featured in both the Masontops and IceFun kits, simplifies the workflow and reduces the need for additional containers.
Conclude the lesson by asking students to brainstorm other vegetables they could ferment at home, reinforcing the versatility of the tools they have just used.
Tips & Pro Tips
- Always use non‑iodized salt; iodine can inhibit bacterial activity.
- Keep the fermentation temperature between 65°F‑75°F (18°C‑24°C) for optimal bacterial growth.
- If bubbles stop forming after several days, the fermentation may be complete; taste to confirm.
- For classrooms with limited storage, the 32 oz Mason Jar Fermentation Kit 4‑Pack provides sturdy glass jars that double as storage containers after fermentation. Priced at $28.49 with a 4.6‑star rating from 182 reviews, it is an economical choice for bulk projects.
- Encourage students to label each jar with the intended flavor (e.g., "Carrot‑Ginger") to foster ownership and excitement.
Troubleshooting
Problem: Mold appears on the surface.
Solution: Remove the mold immediately, add more brine to cover the vegetables, and ensure the weight is properly positioned. Mold often indicates that the vegetables were not fully submerged.
Problem: No bubbles or sour smell after 5 days.
Solution: Check the salt concentration; too much salt can inhibit bacterial activity. Adjust by adding a small amount of fresh brine and monitor for 24‑48 hours.
Conclusion
This guide has equipped educators and parents with a clear, safety‑focused framework for teaching kids about fermentation. By following the step‑by‑step lesson plan, learners experience the scientific process, develop hands‑on skills, and gain confidence in creating probiotic foods. The recommended fermentation kits streamline the workflow, ensuring airtight conditions and easy cleanup, while still allowing flexibility for those who prefer basic kitchen tools. Continue to explore new vegetables and flavor combinations, and watch students become enthusiastic ambassadors of healthy, fermented foods.
Products Mentioned in This Guide
Frequently Asked Questions
What safety precautions should be taken when teaching kids to ferment foods?
Use sanitized jars, wear gloves, keep work surfaces clean, and supervise the handling of live cultures at all times.
What age group is appropriate for hands‑on fermentation lessons?
Children ages 8 and up can safely participate with adult supervision and simplified instructions.
How do you determine the correct amount of salt for a vegetable ferment?
Measure non‑iodized salt by weight (typically 2 % of the vegetable weight) using a kitchen scale for accuracy.
What simple method can students use to monitor pH during fermentation?
A basic pH test strip dipped in the brine gives an instant reading; aim for a pH of 3.5–4.0 for safe, tasty results.
What steps should be taken if mold appears on a ferment?
Discard the batch, clean all equipment thoroughly, and start a new batch using fresh, sterile jars and ingredients.