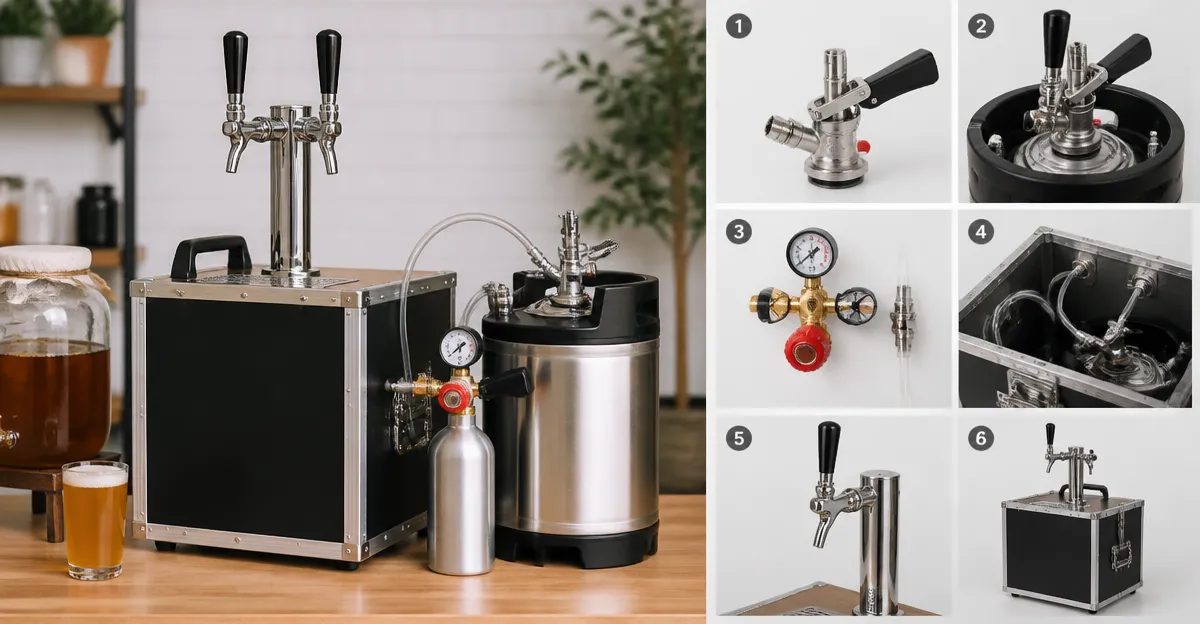
How to Build a Mobile Kombucha Tap Using KegLand Couplers & Micro Taps — Step‑by‑Step DIY Guide
Introduction
Creating a mobile kombucha tap allows entrepreneurs, event planners, and home‑brew enthusiasts to serve fresh, carbonated kombucha at festivals, pop‑up markets, or private gatherings. This guide explains how to assemble a reliable, portable dispensing system using commercial‑grade D‑system keg couplers, a micro tap, and supporting hardware. Readers will learn how each component contributes to safety, flavor preservation, and ease of operation, ensuring that every pour is consistent and leak‑free.
The approach balances professional performance with accessibility; all tools are available on Amazon, and the instructions assume only basic hand‑tool skills. By the end of the guide, one will possess a fully functional mobile kombucha tap that can be set up in minutes and dismantled for transport without compromising hygiene or carbonation.
What You'll Need
- One D‑system keg coupler (choose a model that matches your budget and preferred material).
- Micro tap or draft faucet compatible with 5/16" beer line.
- 5/16" stainless steel beer hose and matching gas hose.
- CO₂ tank with regulator (standard 5‑lb cylinder works well).
- Barb fittings, washers, and hose clamps (often included with couplers).
- Portable keg holder or insulated crate.
- Basic tools: adjustable wrench, screwdriver, and pliers.
All of the required components are listed in the Products Mentioned section at the end of this article, with direct Amazon links for quick ordering.
Step 1 – Choose the Right D‑System Keg Coupler
The heart of any keg‑based dispensing system is the coupler that creates a sealed connection between the keg and your gas and liquid lines. For a mobile kombucha tap, a coupler with a durable stainless‑steel probe, built‑in pressure relief valve, and easy‑lock lever is essential. Three highly rated options are available:
- Kegco D System – Commercial‑grade lever handle, nickel‑plated forged brass body, 55‑psi relief valve; price $31.28, rating 4.7/5 (2,232 reviews).
- JANSAMN D System – Chrome‑plated brass, 304 stainless probe, dual silicone check valves; price $26.99, rating 4.6/5 (878 reviews).
- MRbrew D System – All‑in‑one design with built‑in 55 psi relief valve and quick‑lock lever; price $26.59, rating 4.6/5 (368 reviews).
Each model meets U.S. industry standards (G 5/8 thread) and fits all American “D” Sankey kegs, which are the most common format for commercially produced kombucha. The Kegco coupler offers the most robust construction for high‑traffic events, while the JANSAMN and MRbrew models provide comparable performance at a slightly lower price point.
Select the coupler that aligns with your expected volume and budget. For a first‑time mobile setup, the MRbrew D System provides an excellent balance of price, ease of installation, and leak‑free operation.
Step 2 – Prepare the Gas and Liquid Lines
Properly sized hoses prevent pressure loss and ensure consistent carbonation. Use 5/16" ID stainless steel beer hose for the liquid side and a matching 5/16" gas hose for CO₂. Both the Kegco and MRbrew couplers include the necessary barb fittings; the JANSAMN coupler supplies a 5/16" ID hose and silicone check valves for added sealing.
Attach the beer hose to the coupler’s liquid outlet (often marked with a red or white line) and secure it with a hose clamp. Then connect the gas hose to the CO₂ inlet, again tightening the clamp to avoid slippage. Verify that the check valves are oriented correctly: the gas check valve should allow flow toward the keg, while the beer check valve should prevent backflow into the line.
When using the Cirwurie D System coupler, note that it ships with four stainless‑steel hose clamps; these are essential for a secure, vibration‑resistant connection during transport.
Step 3 – Install the Pressure Relief Valve and Safety Checks
All D‑system couplers feature an automatic pressure relief valve that opens at approximately 53–55 psi. This safety mechanism releases excess pressure before it can over‑carbonate the kombucha, protecting both flavor and equipment. Before tapping the keg, confirm that the valve is unobstructed by gently pressing the release pin; a soft “click” indicates proper function.
Next, attach a CO₂ regulator to the tank and set the output pressure to 12‑15 psi, a typical range for kombucha carbonation. Open the regulator valve slowly, allowing the gas to travel through the check valve and into the keg. Observe the pressure gauge; it should stabilize below the relief valve threshold.
If you are using the Hgkeke D System coupler, the integrated silicone check valve and gasket provide an extra layer of leak protection, which is especially valuable when the tap will be moved frequently.
Step 4 – Mount the Micro Tap
A micro tap (also called a draft faucet) is a compact dispensing device that fits on a standard 5/16" beer line. Choose a tap with a stainless‑steel body to avoid corrosion from the acidic kombucha. Connect the tap’s inlet to the beer hose using a quick‑release fitting, then secure the tap to a portable stand or a custom‑fabricated wooden frame.
When the coupler is locked onto the keg, the liquid will flow through the hose and out the tap. Adjust the tap’s flow control knob to achieve a steady pour of approximately 12‑16 ounces per minute, which is ideal for serving kombucha in glassware without excessive foam.
For a truly mobile solution, consider a battery‑operated tap that includes a built‑in drip tray; this eliminates the need for a separate drip tray and reduces setup time.
Step 5 – Secure the Keg in a Portable Holder
Transporting a full keg requires a sturdy, insulated crate that can absorb shocks and maintain temperature. Many event vendors use a rolling keg cart with a built‑in cooler compartment. Place the keg on its side, ensuring the coupler aligns with the top of the keg where the “D” collar resides.
Insert the lever handle of the chosen coupler (e.g., the Kegco lever) into the keg’s collar slots, then pull down and rotate clockwise until it locks. The lever should sit firmly; a loose lever can cause leaks during movement.
Once locked, double‑check all hose connections and tighten any loose clamps. A quick visual inspection of the liquid and gas lines for drips will confirm a leak‑free setup before you begin serving.
Step 6 – Test the System and Adjust Carbonation
With the coupler locked, CO₂ regulator set, and tap installed, open the tap gently. The first few seconds may produce a small burst of foam; this is normal as the system purges air. Allow the keg to settle for one to two minutes, then pour a test glass of kombucha.
Assess carbonation level by measuring the pour’s resistance and the amount of foam. If the kombucha is under‑carbonated, increase the regulator pressure by 1‑2 psi and allow the keg to rest for 10‑15 minutes before testing again. Conversely, if the kombucha is overly fizzy, reduce the pressure or vent a small amount of CO₂ through the relief valve.
Document the final pressure setting for future events; this eliminates guesswork and ensures consistent quality across multiple servings.
Tips & Pro Tips
- Sanitize all components. Rinse the beer line, tap, and coupler with a food‑grade sanitizer before first use to prevent contamination.
- Label gas and liquid lines. Use colored tape (red for CO₂, white for liquid) to avoid accidental cross‑connections.
- Maintain temperature. Kombucha tastes best between 38‑45°F; a small insulated cooler or a portable fridge unit can keep the keg within this range for several hours.
- Carry spare gaskets. Even high‑quality silicone gaskets can wear over time; having spares ensures quick repairs during long events.
- Use a drip‑free tap. Some micro taps feature a “no‑drip” valve that stops flow when released, reducing waste and mess.
Troubleshooting
| Problem | Possible Cause | Solution |
|---|---|---|
| Leaking at the coupler | Improper lever lock or damaged gasket | Unlock lever, replace gasket, re‑engage lever until it clicks firmly. |
| Low carbonation | Regulator set too low or CO₂ tank empty | Increase regulator pressure by 1‑2 psi; verify tank pressure. |
| Excessive foam | Over‑pressurization or rapid pour | Reduce regulator pressure; pour more slowly. |
| No flow from tap | Clogged line or closed valve | Flush line with warm water; ensure tap valve is open. |
Conclusion
By following these steps, one can construct a reliable, mobile kombucha tap that delivers consistent carbonation, minimal leakage, and professional presentation. Selecting a high‑quality D‑system keg coupler—such as the Kegco, JANSAMN, MRbrew, Hgkeke, or Cirwurie models—provides the foundation for safety and durability. Coupled with proper hose selection, pressure management, and a well‑mounted micro tap, the system becomes a versatile asset for any on‑the‑go beverage service.
Whether the goal is to serve at a weekend market, a corporate event, or a private party, the principles outlined here ensure that each pour maintains the bright, tangy character that makes kombucha a beloved fermented drink. One is encouraged to experiment with flavor infusions, adjust carbonation levels, and refine the portable rig for future iterations.
Products Mentioned in This Guide
Frequently Asked Questions
What is a D‑system keg coupler and why is it needed for a mobile kombucha tap?
A D‑system keg coupler connects the keg to the dispensing system, allowing pressurized kombucha to flow safely and consistently.
Can I use any micro tap with a KegLand coupler?
The micro tap must be compatible with a 5/16" gas line and match the coupler’s thread size for a leak‑free connection.
What basic tools are required to assemble the tap?
Only a wrench, screwdriver, and optional tubing cutter are needed to attach the coupler, hose, and tap.
How do I keep carbonation and flavor intact during transport?
Seal all connections tightly, keep the keg refrigerated, and avoid excessive shaking to preserve carbonation and taste.
Is the mobile kombucha tap suitable for events like festivals?
Yes, its portable design lets you set up and dismantle quickly, making it ideal for festivals, pop‑ups, and private gatherings.