Introduction
Fermentation enthusiasts often rely on ceramic crocks to produce sauerkraut, kimchi, and pickles with authentic flavor and probiotic benefits. A crack in the crock can compromise the airtight environment, leading to contamination and wasted effort. This guide explains how to assess damage, select the appropriate repair tools, and execute a reliable fix that restores the crock to a leak‑free condition. By following the steps, one will preserve the investment in the crock and continue fermenting healthy foods at home.
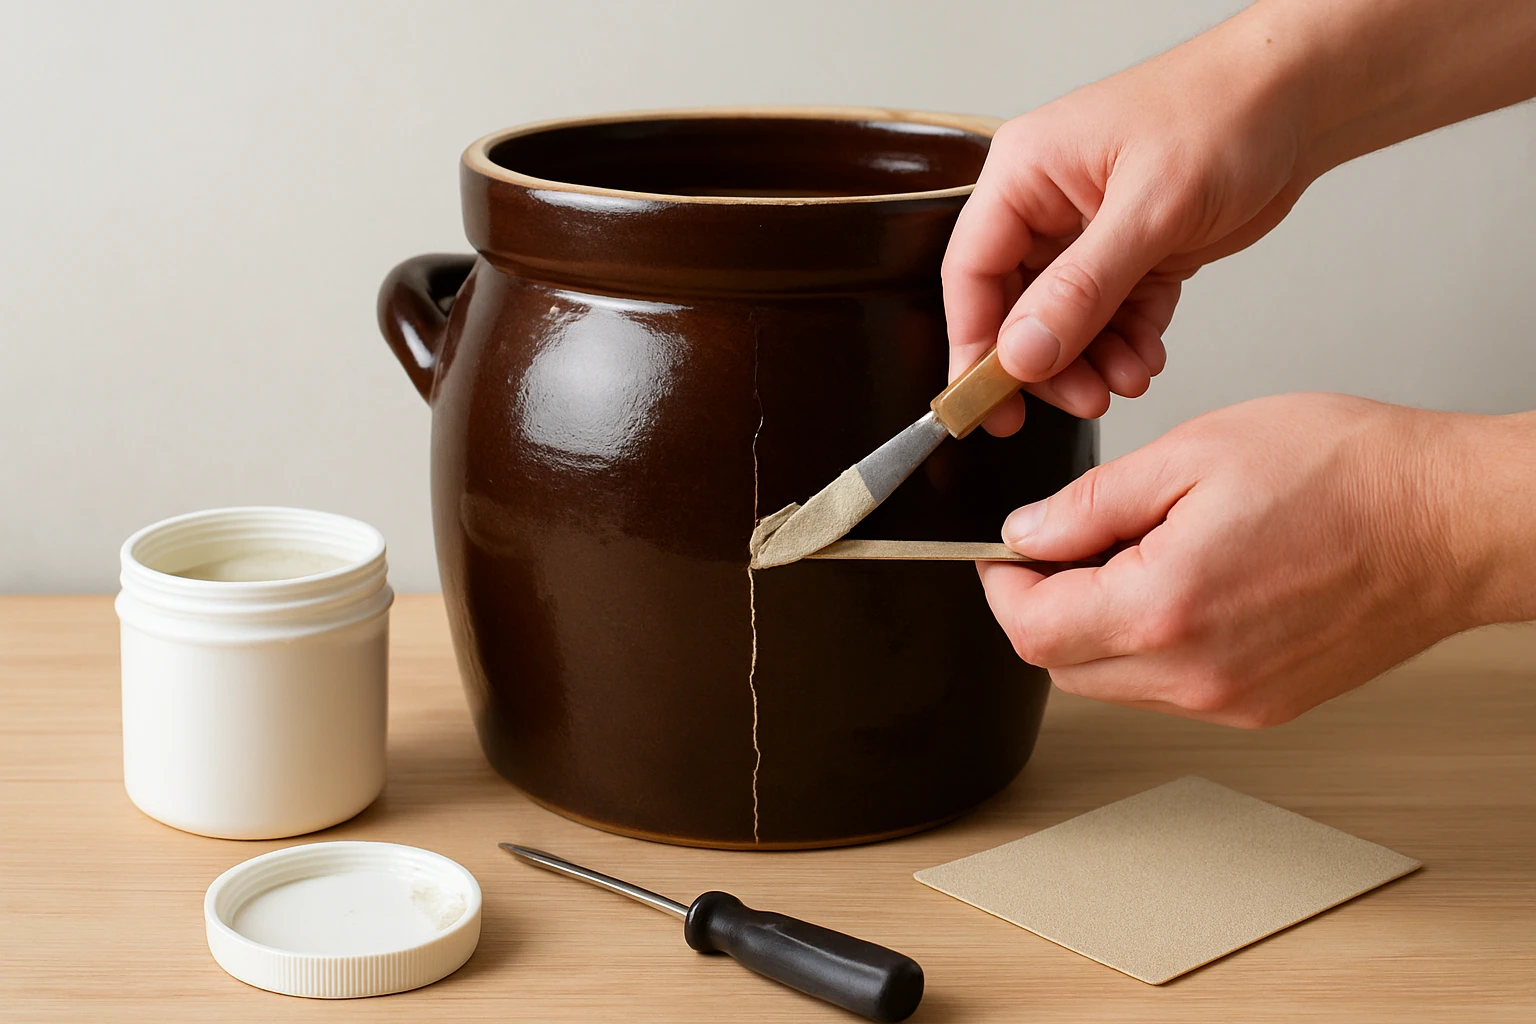
What You’ll Need
- Cleaning supplies (mild dish soap, soft cloth)
- Fine‑grade sandpaper (150‑220 grit)
- Vigorder Ceramic Glue Repair Kit – strong, water‑resistant adhesive for ceramic repair (price $7.99, rating 4.6/5)
- Loctite Power Grab Express – high‑tack construction adhesive for larger fissures (price $4.98, rating 4.4/5)
- Rubber gloves, disposable mixing spatula, and a small applicator brush
- Cloth or paper towels for excess glue removal
Step 1 – Inspect and Clean the Crock
Begin by placing the crock on a stable surface and examining the crack under bright light. Identify whether the fracture is a hairline hairline fissure or a wider split that may require additional support. Using mild dish soap and a soft cloth, gently remove any food residue, brine, or mineral deposits that could hinder adhesion. Rinse with warm water, dry thoroughly, and allow the surface to air‑dry for at least fifteen minutes before proceeding.
Step 2 – Prepare the Surface
Surface preparation is critical for a durable bond; any glossy glaze must be lightly roughened to create mechanical keying. With fine‑grade sandpaper, rub the area surrounding the crack in a circular motion until a matte finish is visible. Avoid excessive sanding that could weaken the crock further; a light, even abrasion is sufficient. After sanding, wipe away dust with a damp cloth and let the area dry completely.
Step 3 – Apply Ceramic Glue for Small Cracks
If the crack measures less than three millimetres, the Vigorder Ceramic Glue Repair Kit provides an optimal solution. This adhesive offers strong bonding, water resistance, and heat resistance, making it suitable for the acidic environment of fermentation. Apply a thin, continuous bead of glue along the crack using the supplied applicator brush, ensuring the adhesive penetrates the fissure fully.
Press the broken edges together and hold them for thirty seconds to allow the initial tack to develop. The kit’s fast‑curing formula sets in 15‑30 seconds, reducing downtime. Wipe away any excess glue with a damp cloth before it cures, as cured glue can be difficult to remove. Allow the repaired area to cure for at least four hours, preferably overnight, before re‑introducing brine.
Step 4 – Reinforce Larger Splits with Construction Adhesive
For cracks wider than three millimetres or for splits that extend across the crock’s wall, the Loctite Power Grab Express offers superior gap‑filling capability. This adhesive delivers a zero‑second instant grab, reducing the need for clamps or external bracing during repair. Load the tube into a caulking gun, cut the nozzle to a 2‑mm opening, and apply a generous bead along the length of the split.
Immediately press the ceramic pieces together, using a rubber glove to apply even pressure. The adhesive remains repositionable for fifteen minutes, allowing fine adjustments to achieve a seamless fit. After positioning, smooth the excess with a disposable spatula and let the product cure for twelve hours for maximum strength. The water‑based formulation cleans up easily with soap and water, ensuring no residue contaminates future ferments.
Step 5 – Reassemble the Crock Components
Once the adhesive has fully cured, reattach the lid, water channel, and any included weights. Verify that the lid sits flush and that the water channel forms a proper seal, preventing dust ingress while allowing gases to escape. If the original weights were damaged during the crack, consider replacing them with new glazed weights to maintain submersion of vegetables during fermentation.
Test the repaired crock by filling it with a small batch of water and observing for leaks over twenty‑four hours. Any persistent seepage indicates that the crack may not have been fully sealed, and a second application of adhesive may be required. When the test is successful, the crock is ready for a full fermentation cycle.
Tips & Pro Tips
- Work in a well‑ventilated area when using adhesives to avoid inhaling fumes.
- Wear rubber gloves to protect skin from prolonged contact with glue.
- For best results, perform repairs at room temperature (20‑25°C) to ensure optimal curing.
- Consider using a food‑grade silicone sealant for peripheral gaps around the lid after the main repair is complete.
- Store the repaired crock upright to prevent stress on the repaired area during drying.
Troubleshooting
Problem: Glue does not adhere to the glaze.
Solution: Ensure the surface is properly sanded to a matte finish; re‑sand if necessary and clean off dust before re‑applying adhesive.
Problem: Persistent leakage after curing.
Solution: Apply a second thin layer of the appropriate adhesive, allowing each layer to cure fully before testing again.
Problem: Cracked area re‑opens during fermentation.
Solution: Reinforce the repair with a thin strip of food‑grade silicone around the exterior of the crack, creating an additional barrier against pressure.
Conclusion
Repairing a cracked fermentation crock is a manageable DIY project when one follows a systematic approach and selects the right adhesives. By cleaning, sanding, applying either Vigorder Ceramic Glue for fine fissures or Loctite Power Grab Express for larger splits, the crock can regain its airtight integrity and continue producing probiotic‑rich foods. Consistent testing and proper curing ensure long‑term durability, allowing one to enjoy home‑fermented vegetables without waste.
Products Mentioned in This Guide
Frequently Asked Questions
Can I safely use a cracked fermentation crock for pickling?
No; cracks break the airtight seal and can let contaminants in, risking spoilage.
What is the first step before repairing a ceramic crock?
Clean the crock thoroughly with mild dish soap and a soft cloth, then dry it completely.
Which adhesive is best for small cracks in a fermentation crock?
A water‑resistant ceramic glue like the Vigorder Ceramic Glue Repair Kit works well for fine fissures.
How should I prepare the cracked area before applying glue?
Lightly sand the crack with 150‑220 grit sandpaper to remove glaze and create a rough surface for better adhesion.
How long should the repaired crock cure before fermenting again?
Allow the adhesive to cure for at least 24 hours in a dry, room‑temperature environment.