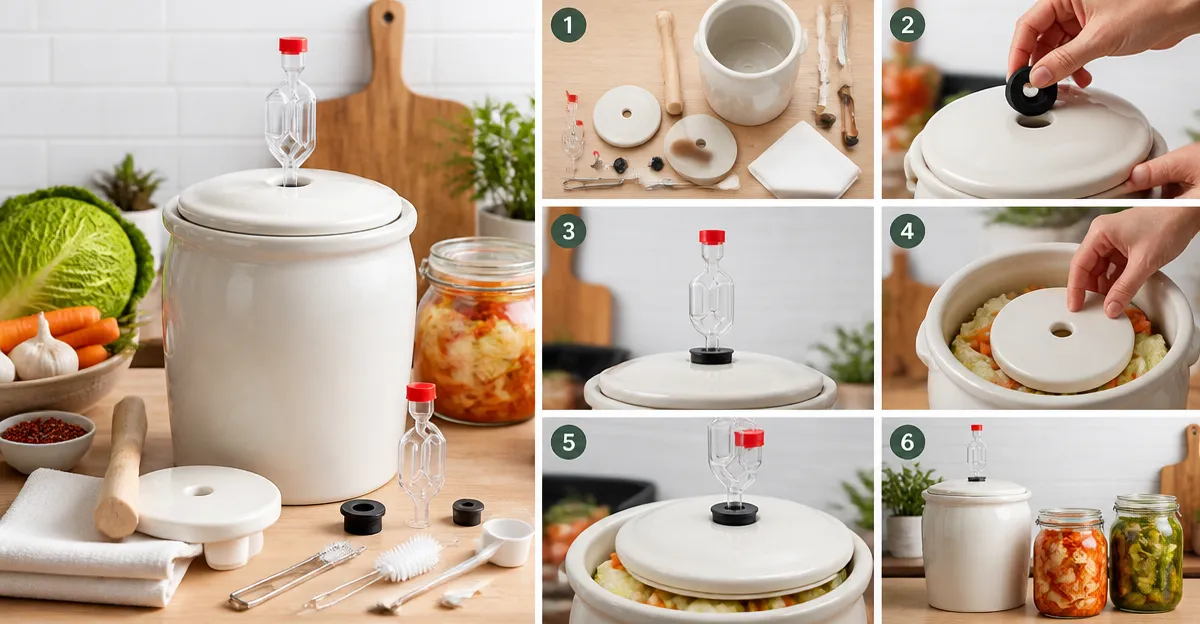
How to Assemble a Home Fermentation Kit Step-by-Step: Easy DIY Guide for Beginners
Introduction
In this guide, one will discover how to create a fully functional home fermentation kit using reliable tools and proven techniques. The process is valuable because it enables the production of probiotic-rich foods such as sauerkraut, kimchi, and pickles without relying on commercial products. By mastering the assembly, beginners gain confidence in controlling flavor, texture, and nutritional content. The guide also highlights cost‑effective solutions that reduce waste and improve kitchen organization.
What You’ll Need
The following items constitute the core of a versatile fermentation system. Each product is linked to its Amazon page for convenient purchase, yet the guide explains how to substitute comparable items if desired.
- Masontops Mason Jar Fermentation Kit – complete 9‑piece kit for wide‑mouth jars.
- Masontops Small Mouth Fermentation Kit – optimized for regular‑mouth jars.
- Lalvam 32 oz Fermentation Jars – two‑jar set with lids, weights, and airlocks.
- Masontops Fermentation Jar Starter Set – single‑jar starter for small batches.
- JILLMO 1.5L Fermentation Jars – two‑pack wide‑mouth jars with airlocks and weights.
Step 1: Choose the Appropriate Mason Jar
The foundation of any fermentation project is a clean, food‑grade mason jar. For larger batches, the Masontops Mason Jar Fermentation Kit provides four wide‑mouth jars that accommodate up to 4‑liter volumes. Its price of $51.00 and rating of 4.8/5 from 4,788 reviews indicate high reliability. If space is limited or one prefers a smaller capacity, the Masontops Small Mouth Fermentation Kit converts regular‑mouth jars into fermenters, costing $49.99 with a 4.7/5 rating. Selecting the appropriate size ensures proper brine coverage and reduces the risk of mold formation.
Step 2: Prepare the Fermentation Lids and Airlocks
Air‑tight lids equipped with one‑way airlocks are essential for maintaining an anaerobic environment while allowing carbon dioxide to escape. The wide‑mouth kit includes four Pickle Pipe airlock lids that vent gas without letting oxygen in, eliminating the need for daily “burping.” The Lalvam 32 oz Fermentation Jars feature stainless‑steel lids with food‑grade PC airlocks, priced at $21.99 for the two‑jar set and rated 4.4/5. The JILLMO jars also incorporate silicone‑sealed airlocks that self‑vent, priced at $34.99 for two jars with a 4.5/5 rating. Using these purpose‑built lids reduces the likelihood of contamination compared with improvised plastic covers.
Step 3: Add Weights to Keep Vegetables Submerged
Fermentation weights prevent vegetables from floating, which would expose them to air and encourage mold. The Masontops kits include four Pickle Pebble glass weights per kit; these are heavy enough to hold dense cabbage but small enough to fit comfortably in most jars. The Lalvam set supplies two glass weights per jar, while the JILLMO kit provides matching glass weights for each 1.5 L jar. All weights are made from food‑grade glass, ensuring no leaching of chemicals. Proper weighting is a critical step for consistent results and is especially important when fermenting low‑salt brines.
Step 4: Assemble the Tamper and Brine Measurement Tools
Compacting vegetables and removing air pockets improves brine penetration. The Masontops kits include an Acacia wood tamper (referred to as a “Pickle Packer”) that fits snugly into wide‑mouth jars. The ergonomic design allows one to press cabbage firmly without breaking delicate leaves. For small‑mouth jars, the same tamper can be used, although a smaller wooden pestle may be preferable. The tamper is included at no extra cost in both the wide‑mouth and small‑mouth kits, contributing to the overall value of $51.00 and $49.99 respectively. Accurate salt measurement is also vital; a kitchen scale paired with the kit’s recipe booklet ensures the correct 2 % salt‑to‑vegetable ratio.
Step 5: Sanitize All Components
Sanitation prevents unwanted microorganisms from competing with beneficial lactobacilli. Place jars, lids, weights, and the tamper in a large pot of water, bring to a gentle boil, and simmer for ten minutes. The Lalvam guide recommends a brief boil for the glass components while washing the silicone gaskets in hot, soapy water. The JILLMO instructions advise dishwasher‑safe cleaning for the jars but hand‑washing for the silicone seals. Consistent sanitation across all tools creates a predictable environment and reduces the chance of off‑flavors.
Step 6: Fill, Seal, and Store Your Ferment
Begin by layering sliced vegetables with the recommended amount of non‑iodized salt. Massage the mixture until it releases its own brine, then pack tightly using the tamper. Add a weight on top, place the airlock lid, and fill the airlock chamber halfway with water. Store the sealed jar at room temperature (65‑72 °F) for the initial fermentation period, typically 3‑7 days for sauerkraut and 5‑10 days for kimchi. Monitor the airlock for gas release; once bubbling slows, transfer the jar to the refrigerator to slow fermentation and preserve flavor.
Tips & Pro Tips
- Use non‑iodized sea salt to avoid inhibiting bacterial activity.
- Keep the jar away from direct sunlight; UV light can degrade beneficial microbes.
- For crispier pickles, add a few grape leaves or a pinch of calcium chloride.
- Label each jar with the start date and type of ferment to track progress.
- If the brine level drops, add a small amount of salted water (2 % salt) to maintain submersion.
Troubleshooting
Mold on the surface: Remove the mold immediately, add more weight, and ensure the airlock is sealed properly. Mold often indicates insufficient brine or exposure to air.
No bubbling airlock: Verify that the airlock chamber contains enough water and that the lid is seated correctly. Low temperature can also slow gas production; moving the jar to a slightly warmer spot may help.
Over‑soft vegetables: Reduce fermentation time or increase the salt concentration by 0.5 %. Excessive enzymatic activity can cause mushiness.
Conclusion
By following these six steps, one can assemble a reliable home fermentation kit that supports a wide variety of probiotic foods. The recommended tools—wide‑mouth and small‑mouth kits, glass jars with airlocks, and sturdy weights—streamline the process and reduce common failures. Armed with the tips and troubleshooting advice provided, beginners can confidently experiment with sauerkraut, kimchi, pickles, and beyond, reaping both culinary and health benefits.
Products Mentioned in This Guide
Frequently Asked Questions
What basic items are required to assemble a home fermentation kit?
You need wide‑mouth or small‑mouth mason jars, fermentation lids or weights, a breathable cloth, and a rubber band or clamp to secure the cover.
Can I use non‑Amazon alternatives for the Masontops fermentation kits?
Yes, any food‑grade mason jars and compatible airlock lids or weight systems work as long as they fit tightly and are easy to clean.
How do I sterilize the jars and accessories before fermenting?
Wash everything with hot, soapy water, rinse well, then place the jars in a boiling water bath for 10 minutes or run them through a dishwasher’s sanitize cycle.
What is the ideal temperature range for most vegetable ferments?
Maintain 65‑75 °F (18‑24 °C) to promote beneficial bacteria while preventing spoilage.
What signs indicate a ferment has gone bad and should be discarded?
Off‑colors, foul odors, mold growth, or a slimy texture are clear signs the ferment is unsafe and must be thrown out.