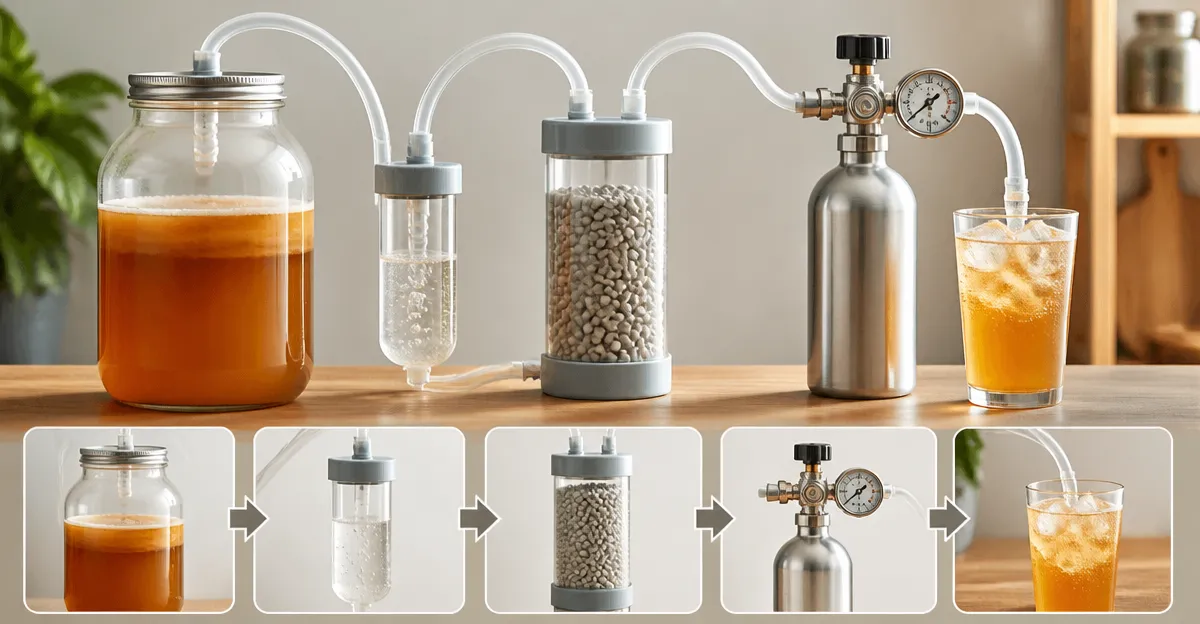
How to Build a DIY Kombucha CO2 Capture and Reuse System — Step‑by‑Step Guide for Homebrewers
Introduction
The homebrewer who produces kombucha often overlooks the valuable carbon dioxide generated during fermentation. Capturing this CO2 not only reduces waste but also provides a natural source of carbonation for future batches. This guide will teach the reader how to design, assemble, and operate a safe and efficient CO2 capture system using readily available components. By the end of the article the reader will possess a functional loop that recycles fermentation gas into a controllable supply for carbonation.
The approach described combines basic physics with practical equipment, ensuring that the system can be built with minimal specialized tools. Safety considerations are integrated throughout the instructions, because pressurized gas demands careful handling. The guide also highlights optional upgrades for larger production volumes, allowing the system to scale with the brewer's ambitions. Overall, the reader will gain confidence in managing gas, pressure, and sanitation within a homebrew environment.
What You’ll Need
- Food‑grade CO2 storage cylinder (10 lb, 20 lb, or 5 lb capacity)
- Dual‑gauge CO2 regulator (Taprite or VEVOR model)
- Food‑grade tubing and quick‑disconnect fittings
- Fermentation lock modified for gas capture
- Pressure‑rated container for temporary gas storage (optional)
- Basic hand tools: wrenches, screwdrivers, pipe cutter
- Safety equipment: goggles, gloves, and a well‑ventilated workspace
Each item listed above is available on Amazon, and the first mention of each product includes a direct affiliate link for convenience. The reader may substitute equivalent components, but the recommended products have been selected for durability, compatibility, and positive user feedback.
Step 1: Prepare the Fermentation Vessel for Gas Capture
The first task is to adapt the kombucha fermentation jar so that CO2 can be diverted into the capture line instead of escaping through the airlock. Begin by cleaning the jar thoroughly with a food‑safe sanitizer and allowing it to air dry. Next, replace the standard airlock with a custom silicone stopper that includes a 1/4‑inch barb fitting; this fitting will connect to the tubing leading to the regulator.
It is essential to ensure that the stopper creates an airtight seal, because any leaks will reduce capture efficiency and may pose safety hazards. Use a food‑grade silicone sealant around the barb if necessary, and verify the seal by submerging the vessel in water and observing for bubbles while the kombucha ferments. This modification allows the CO2 to flow directly into the capture system while maintaining the anaerobic environment required for kombucha cultures.
Step 2: Select and Install the CO2 Storage Cylinder
For most homebrew setups a VEVOR 10 lb CO2 Tank offers an optimal balance of capacity and portability. The tank is constructed from lightweight aluminum alloy, weighs 15.87 lb when empty, and features a CGA320 valve compatible with standard 8 mm hoses. Its working pressure of up to 1800 PSI and tested limit of 3000 PSI provide a generous safety margin for home use. Priced at $119.90 and holding a rating of 4.6 out of 5 stars from over 500 reviews, this cylinder is praised for durability and ease of handling.
If the brewer anticipates larger batches, the VEVOR 20 lb CO2 Tank can be substituted. Although heavier at 26.46 lb, it doubles the gas storage capacity, allowing up to 23 small kegs worth of CO2 to be captured before a refill is required. Both tanks ship empty, enabling the brewer to fill them with food‑grade CO2 at a local supplier, which is often more economical than purchasing pre‑filled cylinders.
Step 3: Attach a Dual‑Gauge Regulator for Precise Pressure Control
Regulating the pressure of captured CO2 is critical to prevent over‑pressurization of the fermentation vessel and to deliver consistent carbonation to subsequent batches. The Taprite Dual Gauge CO2 Regulator provides two independent gauges—one for tank pressure and one for downstream keg pressure—allowing the brewer to monitor both values simultaneously. It includes a built‑in 5 micron filter, a check valve to prevent backflow, and a durable polycarbonate bonnet that resists chipping and fading. Priced at $69.65 with a rating of 4.4 out of 5 stars from 347 reviews, this regulator is recognized for reliability in beverage applications.
For a more budget‑friendly alternative, the VEVOR Dual Gauge CO2 Regulator offers similar functionality at $33.90 and a rating of 4.2 out of 5 stars. Its adjustable pressure range of 0‑60 PSI, pressure relief valve set at 65 PSI, and CGA320 compatible inlet make it suitable for kombucha systems. The regulator includes gaskets and clamps to secure connections and a check valve to protect the keg from back‑pressure. Selecting either regulator depends on the brewer’s budget and desired feature set.
Step 4: Connect Tubing and Quick‑Disconnect Fittings
Use food‑grade silicone or polyurethane tubing rated for at least 2000 PSI to connect the fermentation vessel outlet to the regulator inlet. Cut the tubing to a length that allows comfortable routing without kinks, typically 12‑18 inches. Attach a 5/16‑inch barb fitting to the tubing end that will mate with the regulator’s inlet; the Taprite regulator includes an integrated 5/16 barb, while the VEVOR model requires a separate fitting.
Secure the connection with a hose clamp to prevent slippage under pressure. On the downstream side of the regulator, attach a quick‑disconnect fitting that will interface with the carbonation cap of the next batch’s bottle or keg. This arrangement enables the brewer to switch between filling containers without depressurizing the entire system, thereby improving efficiency and safety.
Step 5: Test the System for Leaks and Pressure Stability
Before introducing CO2 from the kombucha fermentation, perform a thorough leak test. Close the regulator valve, apply a small amount of soapy water to each connection, and gradually increase the tank pressure to 30 PSI using a portable CO2 source. Bubbles indicate a leak; tighten connections or replace faulty fittings as needed. Verify that the regulator’s pressure gauges read accurately by comparing them to a calibrated handheld pressure gauge.
Once the system is leak‑free, open the fermentation vessel’s capture line and allow CO2 to flow into the tank. Monitor the tank gauge; the pressure should rise steadily but remain below the regulator’s set point (typically 10‑15 PSI for kombucha). Adjust the regulator knob to maintain the desired pressure, ensuring that the fermentation vessel does not become over‑pressurized, which could damage the SCOBY culture.
Step 6: Carbonate Future Batches Using Captured CO2
When a new batch of kombucha is ready for bottling, connect the quick‑disconnect fitting to a carbonation cap fitted on a sanitized bottle. Set the regulator to the target carbonation pressure—30 PSI is a common starting point for kombucha, producing gentle effervescence without excessive foaming. Open the regulator valve and allow CO2 to flow into the bottle for 30‑45 seconds, then close the valve and gently shake the bottle to promote dissolution.
After carbonation, release excess pressure by briefly opening the bottle’s vent, then seal the bottle with a swing‑top or crown cap. Store the bottles at refrigeration temperature for 24‑48 hours to stabilize the carbonation. The captured CO2 from previous fermentations can be reused indefinitely, providing cost savings and reducing the environmental impact of disposable gas cylinders.
Tips & Pro Tips
- Always store CO2 cylinders upright and secure them with a chain or strap to prevent tipping.
- Label the tank with the date of the last fill; most suppliers recommend refilling every 6‑12 months depending on usage.
- Use a pressure‑rated container (such as a small steel canister) as a buffer if the fermentation rate exceeds the regulator’s flow capacity.
- Periodically purge the tubing with fresh CO2 to remove moisture that could cause corrosion.
- When scaling up, consider installing a pressure‑relief valve on the fermentation vessel to protect the SCOBY from accidental over‑pressurization.
Troubleshooting
Problem: Regulator gauge reads lower than expected.
Solution: Verify that the regulator is fully opened and that the tank pressure is above the regulator’s minimum setting. If the discrepancy persists, compare the reading with an independent pressure gauge; a faulty gauge may need replacement.
Problem: CO2 does not flow into the bottle during carbonation.
Solution: Check that the quick‑disconnect fitting is fully seated and that the hose clamp is tight. Ensure the regulator’s pressure knob is set above the bottle’s internal pressure; a low setting will prevent gas entry.
Problem: Persistent hissing sound from the tank connection.
Solution: Apply a fresh washer to the CGA320 valve and re‑tighten the connection. If the hissing continues, replace the washer or inspect the valve for damage.
Conclusion
This guide has demonstrated how a homebrewer can capture, store, and reuse CO2 generated during kombucha fermentation, turning a by‑product into a valuable resource. By following the step‑by‑step instructions, the brewer creates a safe, efficient system that reduces waste, lowers operating costs, and enhances the quality of future batches. The recommended equipment—such as the VEVOR CO2 tanks and Taprite or VEVOR regulators—offers reliability and ease of use, but the system can also be assembled with alternative components if desired.
Implementing this DIY CO2 loop empowers the brewer to experiment with carbonation levels, improve consistency, and contribute to sustainable brewing practices. The reader is encouraged to adapt the design to personal needs, maintain regular safety checks, and enjoy the enhanced flavor profile that controlled carbonation brings to kombucha.
Products Mentioned in This Guide
Frequently Asked Questions
What is the purpose of a DIY kombucha CO2 capture system?
It recycles the fermentation CO2, reducing waste and providing a natural source of carbonation for future batches.
Is it safe to capture and reuse CO2 from kombucha fermentation at home?
Yes, if you follow the guide’s safety steps, use food‑grade equipment, and monitor pressure to avoid over‑pressurization.
What basic components are required to build the system?
A food‑grade CO2 storage cylinder, tubing, a one‑way valve, a pressure regulator, and a sanitation‑friendly container for the gas.
How does the captured CO2 get transferred to a new batch for carbonation?
The CO2 is routed from the storage cylinder through tubing into the new kombucha batch using a regulator to control flow and pressure.
Can the system be scaled for larger kombucha production?
Yes, optional upgrades like larger cylinders and higher‑capacity valves allow the system to handle increased fermentation volumes.