Introduction
This guide explains how to recognise visual signs of spoilage in fermented vegetables, beverages and dairy. Readers will learn to differentiate between harmless surface growth and harmful contamination, understand the microbiological basis of spoilage, and discover reliable tools for testing. The article also recommends practical products that assist in maintaining a safe fermenting environment. By the end of the guide, one will be able to intervene early, protect flavour integrity, and prevent health risks.
Background and Context
Fermentation relies on a balanced community of lactic acid bacteria, yeasts and occasionally moulds that produce acids, carbon dioxide and flavour compounds. When the balance is disturbed, undesirable organisms may proliferate, leading to off‑colours, unpleasant odours and potential toxin formation. Common spoilage agents include mould (visible as fuzzy or coloured growth), yeast (often a white film or pellicle), and bacterial pathogens that may not be visible but can cause rapid acidity loss.
Environmental factors such as temperature, oxygen exposure, and brine level play a critical role in preventing contamination. Maintaining vegetables fully submerged in brine is essential because exposure to air creates a niche for aerobic moulds. The use of specialised weights and air‑tight lids reduces this risk dramatically.
In addition to visual inspection, laboratory‑grade testing kits provide quantitative confirmation of mould presence. These kits are especially valuable for home producers who wish to verify the safety of large batches or for those with respiratory sensitivities.
Identifying Mold Contamination
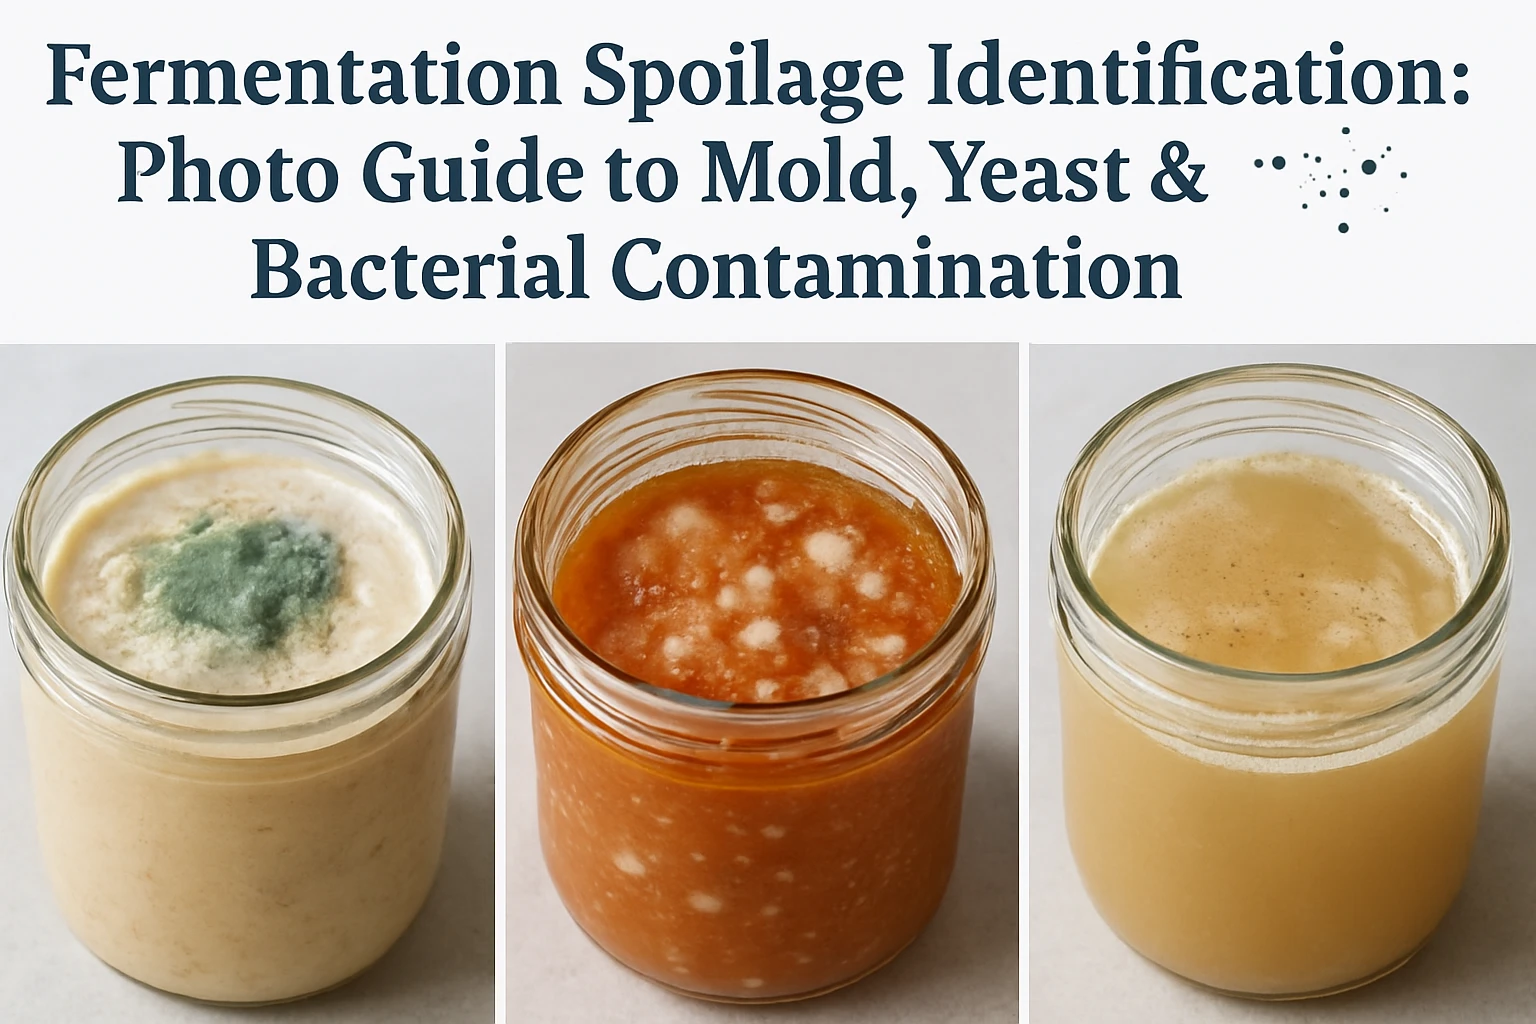
Mould appears as coloured, fuzzy patches that may be white, green, black, blue or grey. The texture is often velvety or powdery, and the growth may spread rapidly across the surface of the brine. In a properly sealed jar, mould typically originates at the air‑liquid interface, indicating that some portion of the ferment is exposed to oxygen.
Photographic examples show that white mould often resembles milk‑shake foam, while green or black mould presents a more pronounced, almost hair‑like structure. If the mould emits a musty or earthy odour, it is a strong indicator of contamination.
When mould is observed, the safest course of action is to discard the entire batch, because mycotoxins may have diffused throughout the product. However, for small surface growth on a well‑submerged batch, one may remove the affected portion, re‑weigh the vegetables, and add a fresh layer of brine.
To prevent mould, the use of Masontops Glass Fermenting Weights is recommended. These clear glass stones keep vegetables submerged, reduce air exposure, and feature a finger‑grip for easy removal.
Identifying Yeast Pellicles
Yeast pellicles manifest as thin, translucent or slightly opaque films that float on the surface of the liquid. They differ from mould in that they are smoother, lack colour, and often have a slightly rubbery feel when touched with a clean utensil.
In kombucha and water kefir, a pellicle is a normal part of the fermentation process; however, in vegetable ferments a yeast film may signal an imbalance. If the pellicle is accompanied by a sweet or alcoholic aroma, it suggests that yeasts have outcompeted lactic bacteria.
Removal of the pellicle and the addition of a fresh weight, such as the Masontops Glass Fermenting Weights, can restore submersion and encourage the return of lactic acid production.
Identifying Bacterial Spoilage
Bacterial spoilage is more subtle because it often does not produce visible growth. Indicators include a sudden loss of acidity (pH rises), a foul or putrid smell, and a slimy texture on the vegetables. In some cases, pathogenic bacteria such as Clostridium botulinum may produce gas bubbles that lift the lid or cause the jar to bulge.
Because visual cues are limited, testing kits become essential. Both the ENESNES Home Mold Test Kit and the KAYENQO Home Mold Test Kit include agar plates that detect a broad spectrum of moulds and, indirectly, bacterial contamination by indicating abnormal growth patterns.
When a test plate shows extensive fungal colonies, it confirms that the environment is conducive to further bacterial growth. In such cases, the entire batch should be discarded and sanitation protocols reviewed.
Comparison and Selection Guide
| Feature | Masontops Glass Fermenting Weights | ENESNES Home Mold Test Kit | KAYENQO Home Mold Test Kit |
|---|---|---|---|
| Primary Use | Weight vegetables to keep them submerged | Detect mould on surfaces and in air (8 tests) | Detect mould on surfaces and in air (12 tests) |
| Material | Non‑porous crystal clear soda‑lime glass | Agar plates, swabs, gloves | Agar plates, swabs, gloves |
| Price (USD) | $21.99 | $13.99 | $29.09 |
| Average Rating | 4.7/5 (3,922 reviews) | 4.4/5 (736 reviews) | 4.6/5 (3,339 reviews) |
| Number of Tests | Not applicable | 8 separate plates | 12 separate plates |
| Convenient Features | Finger grip for easy removal; dishwasher safe | 48‑96 hour results; lab support for identification | Two‑package design for retesting; detailed mold guide |
For fermenters who primarily need to prevent mould exposure, the Masontops Glass Fermenting Weights provide a low‑maintenance solution. For those who wish to verify the absence of mould after a suspect batch, the ENESNES kit offers a quick eight‑test option at a lower price point. The KAYENQO kit is ideal for extensive testing across multiple locations, such as homes with several fermenting jars, because it supplies twelve plates and a comprehensive identification guide.
Best Practices & Tips
- Always ensure vegetables remain fully submerged; use weights or a brine‑filled airlock.
- Maintain fermentation temperatures between 60‑75°F (15‑24°C) to favour lactic bacteria.
- Inspect jars daily for any signs of surface growth; remove any visible mould immediately.
- Sanitise all equipment with a food‑grade sanitizer before each use.
- When using test kits, follow the incubation instructions precisely and record observations with photographs for future reference.
- Store completed test plates in a cool, dark place to prevent additional growth before analysis.
- Consider rotating jars weekly to redistribute brine and minimise stagnant pockets where mould can develop.
Frequently Asked Questions
- What is the difference between mould and yeast in a ferment?
- Mould forms fuzzy, coloured colonies that require oxygen, while yeast creates a smooth, often colourless pellicle and can thrive in low‑oxygen environments. Both can indicate an imbalance, but mould poses a higher health risk.
- Can I salvage a ferment that has a small amount of surface mould?
- If the mould is limited to a thin layer and the vegetables remain fully submerged, one may remove the affected portion, add fresh brine, and use a weight such as the Masontops Glass Fermenting Weights to prevent recurrence. However, if the mould has spread extensively, discarding the batch is the safest option.
- How long does it take to see results from a home mould test kit?
- Both the ENESNES and KAYENQO kits provide visible colony growth within 48‑96 hours. Lab identification, when requested, typically returns within 24‑48 hours.
- Do I need a separate test for bacterial contamination?
- Most home kits focus on mould detection; bacterial spoilage is usually inferred from sensory changes such as off‑odours, loss of acidity, or gas formation. Professional laboratory analysis is required for definitive bacterial identification.
- Are glass fermenting weights safe for dishwasher use?
- Yes, the Masontops Glass Fermenting Weights are hand‑washable and also safe on the top rack of a dishwasher, as they are made from non‑porous soda‑lime glass.
- How many times can I reuse the test plates?
- Test plates are designed for single‑use only; reusing them compromises sterility and may lead to inaccurate results.
Conclusion
Accurate identification of mould, yeast and bacterial spoilage is essential for producing safe, flavorful fermented foods. Visual inspection, combined with the strategic use of weights and professional‑grade testing kits, provides a robust defence against contamination. By following the best‑practice recommendations outlined in this guide, one can maintain a healthy microbial ecosystem, minimise waste, and enjoy consistent fermentation results.
Products Featured in This Guide
Masontops Glass Fermenting Weights
Price: $21.99 | Rating: 4.7/5 (3,922 reviews)
Featured because it keeps vegetables fully submerged, preventing aerobic mould growth, and includes a handy finger grip for effortless removal.
ENESNES Home Mold Test Kit
Price: $13.99 | Rating: 4.4/5 (736 reviews)
Featured for its eight‑test agar plates, rapid 48‑96 hour results, and optional lab identification, making it ideal for quick home assessments.
KAYENQO Home Mold Test Kit
Price: $29.09 | Rating: 4.6/5 (3,339 reviews)
Featured for its twelve‑test capacity, two‑package design for retesting, and comprehensive identification guide, suitable for extensive home testing scenarios.
Frequently Asked Questions
What visual signs indicate mold spoilage in fermented foods?
Mold appears as fuzzy, colored patches (green, black, white) on the surface and should be discarded immediately.
How can I tell if a white film on my ferment is harmless yeast or harmful contamination?
A thin, uniform white pellicle is typical of harmless yeast, while thick, irregular or discolored films may signal spoilage.
Which quick tests can confirm bacterial contamination in a ferment?
pH strips, a drop of phenolphthalein, or a simple hydrogen sulfide test can reveal unexpected acidity loss or pathogen growth.
What products are recommended to maintain a safe fermenting environment?
Airlock lids, sterilized fermentation jars, and pH monitoring kits help control oxygen exposure and acidity.
How does temperature affect the risk of spoilage during fermentation?
Higher temperatures accelerate unwanted microbial growth, so keeping fermentations within the recommended range (typically 60‑70°F/15‑21°C) reduces spoilage risk.