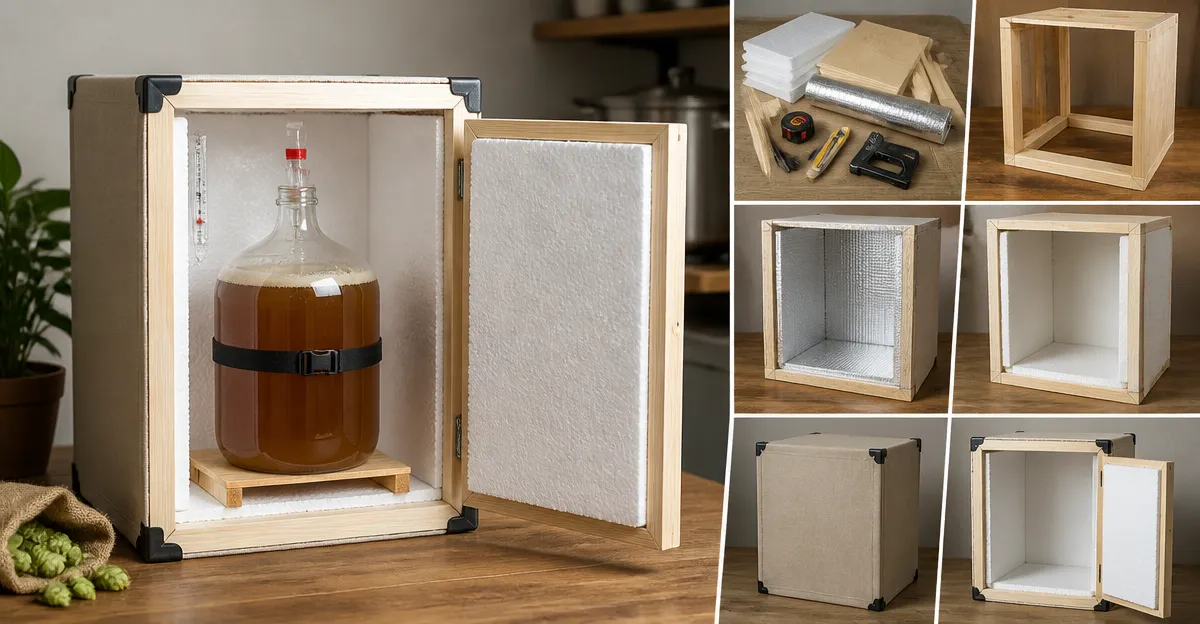
How to Build a DIY Insulated Fermentation Box with No Power: Step-by-Step Passive Temperature Control for Homebrewing
Introduction
Fermenting beer, kimchi, or sauerkraut at home requires a stable temperature range, yet many hobbyists lack a dedicated climate‑controlled chamber. This guide teaches one how to construct an insulated fermentation box that relies solely on passive temperature regulation, eliminating the need for electricity. By the end of the article, the reader will understand the physics of thermal mass, how to select appropriate containers, and how to assemble a durable, low‑cost box that maintains the ideal 55‑68°F (13‑20°C) range for most homebrews.
The approach combines inexpensive building materials with purpose‑built fermentation containers, allowing the builder to achieve professional‑grade results without a pricey fridge or temperature controller. The guide is written for an intermediate audience; basic carpentry skills are assumed, but every step is explained in detail.
What You'll Need
- Fermentation container(s) – see product recommendations below
- Rigid foam board insulation (½‑inch to 1‑inch thickness)
- 2×4 lumber for the frame
- Weather‑strip or silicone sealant for airtight joints
- Thermometer with probe
- Water bottles or phase‑change packs for thermal mass
- Basic tools: saw, drill, screws, measuring tape
The following products are especially well suited for the container portion of the build. They are linked at their first appearance and described in context.
Step 1: Choose the Right Fermentation Container
The heart of any fermentation box is a container that can create an anaerobic environment while resisting odor leakage. The e-jen 1.7L Fermentation Container offers a compact 0.45‑gal capacity, an adjustable inner vacuum lid, and a rating of 4.7/5 from over 4,000 reviewers. Priced at $17.99, it is dishwasher‑safe, freezer‑safe, and built from BPA‑free polypropylene, making it ideal for small‑batch kimchi or starter cultures.
For larger batches, the e-jen 3.4L Fermentation Container provides 0.9 gal of volume at $19.99. Its double‑lid system further reduces odor escape, and the same inner pressing plate creates a reliable vacuum seal. Both containers feature a transparent design that lets you monitor fermentation progress without opening the lid.
If you prefer a visual cue, the e-jen Green 3.4L Fermentation Container offers the same functionality in a green finish, allowing easy identification among multiple containers.
For very large batches, the Crazy Korean Cooking 5.2L Fermentation Container holds over five liters, is constructed from a polypropylene‑clay blend for optimal porosity, and costs $28.99. Its sand‑brown color mimics traditional Korean Onggi, and the adjustable inner lid minimizes air exposure.
Step 2: Build the Insulated Frame
Construct a rectangular frame using 2×4 lumber that matches the external dimensions of your chosen container plus a 2‑inch clearance on each side. This clearance allows a layer of rigid foam board to be attached to the interior walls, creating a thermal barrier. Cut the lumber to length, assemble the rectangle with screws, and add cross‑supports every 12 inches for rigidity.
Attach ½‑inch foam board to the interior surfaces using a spray adhesive or double‑sided tape. Foam board has a high R‑value, meaning it slows heat transfer. Seal the seams with weather‑strip tape to prevent drafts. The foam layer should be continuous; any gaps will compromise temperature stability.
Once the insulation is in place, line the interior with a thin polyethylene sheet to protect the foam from moisture. This barrier also makes cleaning easier after spills.
Finally, position the fermentation container inside the frame, ensuring it sits on a level surface. The container should not touch the foam directly; a small wooden spacer (1‑inch thick) keeps the container centered and allows air circulation.
Step 3: Add Thermal Mass for Passive Temperature Regulation
Thermal mass absorbs excess heat during the day and releases it at night, smoothing temperature fluctuations. Fill several 1‑liter water bottles with tap water, seal them, and place them around the container inside the insulated box. Water has a high specific heat capacity, making it an excellent heat sink.
If you live in a colder climate, consider using phase‑change packs that melt at 55°F (13°C). These packs store latent heat and release it slowly, keeping the interior above the minimum fermentation temperature.
Arrange the bottles or packs symmetrically to avoid uneven cooling. The total mass should be roughly equal to the volume of the container; for a 3.4 L fermenter, three to four 1‑L bottles work well.
Secure the bottles with a small piece of non‑slip mat or a custom wooden rack to prevent movement when the lid is opened.
Step 4: Install a Monitoring System
Place a digital thermometer with a probe inside the container, but not touching the walls. This provides an accurate reading of the fermentation temperature. Record the temperature at several times of day for the first week to confirm that the passive system remains within the target range.
If the temperature drifts outside the desired band, adjust the thermal mass: add more water bottles for heat retention or remove some for cooling. Small adjustments can have a noticeable effect because the insulated box has low thermal inertia.
For those who wish to track data remotely, a Bluetooth‑enabled thermometer can be paired with a smartphone app, but this is optional and not required for the basic build.
Maintain a log of temperature readings; this data helps you fine‑tune the system for future batches.
Step 5: Seal the Box and Perform a Test Run
Close the lid of the insulated frame tightly. If the frame uses a hinged lid, affix a magnetic latch or a simple strap to keep it sealed. Apply a thin bead of silicone sealant along the perimeter to eliminate drafts.
Place a small batch of water with a pinch of salt inside the fermenter to simulate a real fermentation. Monitor the temperature for 24‑48 hours. The temperature should stay within a 5‑degree window, confirming the passive system works as intended.
During the test, check for condensation on the interior walls. Excess moisture can be wiped away with a cloth; persistent condensation may indicate insufficient sealing.
Once satisfied, replace the water with your actual brew, starter, or kimchi, and let the box perform its duty for the required fermentation period.
Tips & Pro Tips
- Location matters: Place the insulated box in a room that experiences minimal temperature swings, such as a basement or pantry.
- Use a reflective surface: Line the interior of the box with a thin aluminum foil sheet to reflect radiant heat back toward the fermenter.
- Rotate containers: If you have multiple fermenters, rotate them weekly to equalize exposure to any residual heat sources.
- Seasonal adjustments: In summer, add a small fan to circulate air across the exterior of the box, increasing heat loss. In winter, add extra water bottles or a small heated blanket set to low.
- Cleaning: The e-jen 1.7L Fermentation Container and other e‑jen models are dishwasher‑safe, simplifying cleanup after each batch.
Troubleshooting
| Problem | Possible Cause | Solution |
|---|---|---|
| Temperature drops below 55°F | Insufficient thermal mass or cold ambient room | Add more water bottles or move the box to a warmer location. |
| Temperature rises above 68°F | Excessive solar gain or poor ventilation | Shade the box, add a vent, or replace some water bottles with ice packs. |
| Odor leaks | Improper seal on container lid | Check the inner vacuum lid of the e‑jen container; ensure it is fully depressed. |
| Condensation buildup | High humidity inside the box | Place a small desiccant packet or increase airflow by briefly opening the lid. |
Conclusion
By following these steps, the reader can construct a reliable, power‑free insulated fermentation box that leverages thermal mass and high‑performance containers. The system provides a stable environment for homebrewing, kimchi, sauerkraut, or any other fermented product, reducing reliance on expensive temperature‑controlled appliances. With careful placement, regular monitoring, and occasional adjustments, the box will serve as a versatile tool for years to come.
Experiment with different container sizes—such as the e-jen 3.4L Fermentation Container for larger batches or the Crazy Korean Cooking 5.2L Fermentation Container for bulk fermentations—to expand your capabilities. Happy fermenting!
Products Mentioned in This Guide
Frequently Asked Questions
What materials are best for building a passive insulated fermentation box?
Use rigid foam board (½‑inch to 1‑inch), a sturdy wooden frame, and a food‑grade fermentation vessel with a tight‑fitting lid.
How does thermal mass help maintain fermentation temperature?
Thermal mass absorbs heat when temperatures rise and releases it when they drop, smoothing out daily fluctuations inside the box.
Can I use a regular cooler instead of building a box from scratch?
Yes, a well‑sealed cooler with added foam insulation and a temperature‑stable container works as a quick DIY solution.
What temperature range should I aim for with most homebrews?
Aim for 55‑68°F (13‑20°C), which covers the optimal range for most ales, lagers, kimchi, and sauerkraut.
Do I need any active cooling or heating for the box?
No, the passive design relies on insulation, thermal mass, and placement in a stable environment, eliminating the need for electricity.