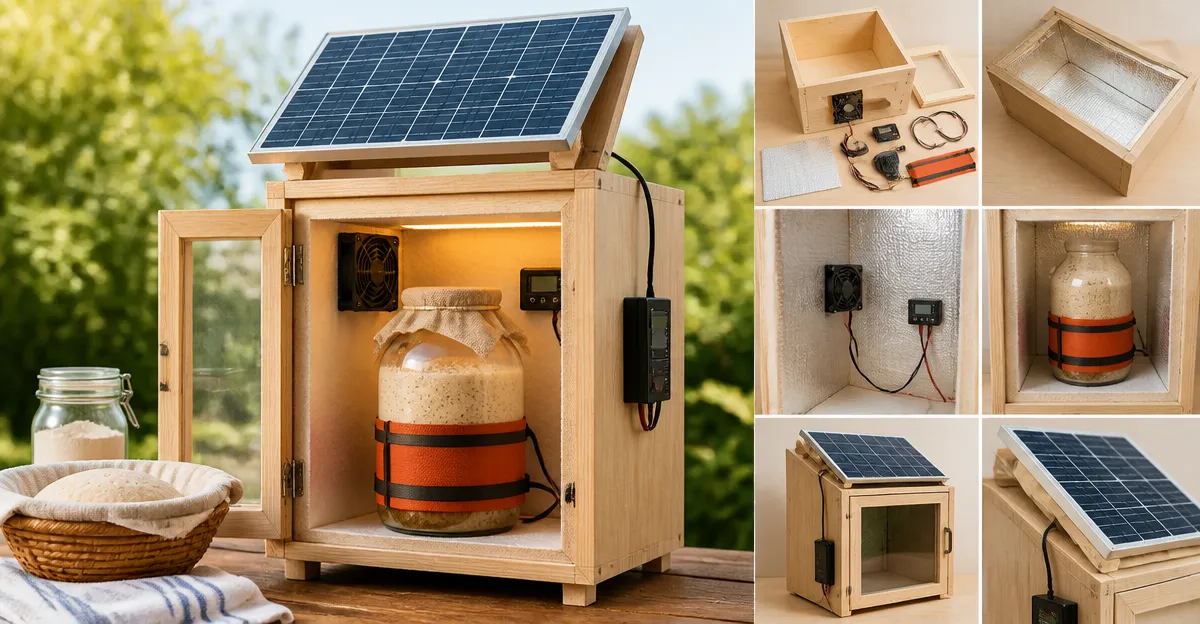
How to Build a Solar-Powered Fermentation Chamber: DIY Step-by-Step Plans
Introduction
This guide explains how to create a reliable fermentation chamber that runs entirely on solar energy. One will learn how to design an insulated enclosure, install a solar panel and battery system, and integrate temperature‑control tools. The result is a stable environment for sourdough, kombucha, yogurt, and home‑brew wine, even when ambient temperatures fluctuate. By following the instructions, a home baker or brewer can reduce energy costs, increase consistency, and gain confidence in the fermentation process.
The guide is written for an intermediate audience that already possesses basic woodworking skills and a modest understanding of solar power. Nevertheless, each step includes detailed explanations so that a motivated beginner can still succeed. The recommended products are optional tools that simplify critical tasks such as temperature regulation and humidity management.
What You’ll Need
The following materials and tools are required. Some items are available on Amazon and are highlighted in the steps that follow.
- Insulated paneling or rigid foam board (minimum 2‑inch thickness)
- Wood framing lumber (2×4s) for the outer shell
- Solar panel (20‑W minimum) with mounting brackets
- 12‑V deep‑cycle battery and charge controller
- DC‑to‑AC inverter (optional, for AC‑powered accessories)
- Temperature controller and humidity gauge (see product recommendations)
- Silicone sealant and weather‑stripping tape
- Basic hand tools: drill, saw, screwdriver, level, measuring tape
Optional but highly useful accessories include a CasaChic Bread Proofing Box for precise temperature control, an Aurelema Bread Proofing Box for a budget‑friendly alternative, a Nordic Canyon Bread Proofing Box for a compact design, a Hemlock Kombucha Heating Wrap for localized warming, and a FastRack Fermentation Airlock Set for airtight sealing of bottles.
Step 1: Design the Enclosure
Begin by sketching a rectangular box that will house the fermentation vessels. A typical size of 24" × 18" × 12" provides sufficient space for multiple loaves or jars while remaining portable. The internal volume should be filled with insulated paneling to maintain a constant temperature. Use a spreadsheet to calculate the heat loss based on the surface area and the desired temperature differential; this will inform the required solar panel wattage.
When planning the layout, allocate a shelf for a proofing box or heating wrap. The shelf should be positioned near the center of the chamber to promote even heat distribution. Mark the locations for wiring, ventilation vents, and a viewing window. A clear acrylic panel of 2" × 2" can serve as a low‑loss observation port.
Why a proofing box is valuable at this stage: devices such as the CasaChic Bread Proofing Box provide built‑in temperature and humidity control, eliminating the need for a separate thermostat. Its double‑decker design allows multiple containers to be stacked, maximizing the use of interior space.
Step 2: Build the Frame and Apply Insulation
Cut the 2×4 lumber to the dimensions of the outer frame. Assemble the frame using wood screws and a level to ensure squareness. Once the frame is sturdy, attach rigid foam board to the interior using construction adhesive. Seal all seams with silicone sealant and apply weather‑stripping tape around the door opening to prevent drafts.
For added durability, consider reinforcing the corners with metal brackets. The insulation thickness of at least two inches will reduce the power demand on the solar system, allowing the chamber to stay within the target temperature range of 70‑80°F during winter months.
At this point, install the viewing window by cutting an opening in the foam board and securing the acrylic panel with silicone. The window enables visual monitoring without opening the door, a feature also found on the CasaChic Bread Proofing Box (price $59.99, rating 4.8/5 from 14 reviews).
Step 3: Install the Solar Power System
Mount the solar panel on a sunny roof or a portable stand positioned at a 30‑degree angle toward the equator. Connect the panel to a charge controller, then to a 12‑V deep‑cycle battery. Use appropriately sized gauge wire and waterproof connectors to ensure safety. If the proofing box or heating wrap requires AC power, connect the battery to an inverter rated for at least 300 W.
Calculate the daily energy consumption of the temperature control device. For example, the CasaChic Bread Proofing Box draws roughly 40 W when heating; a 20‑W solar panel can sustain this load during daylight hours, while the battery supplies power at night. Verify that the battery capacity (amp‑hours) exceeds the total energy demand by at least 20 % to avoid deep discharge.
Secure all cables with zip ties and label each connection. Proper cable management reduces the risk of accidental unplugging and simplifies future maintenance.
Step 4: Integrate Temperature and Humidity Control
Place the chosen proofing box on the interior shelf. If budget constraints are a concern, the Aurelema Bread Proofing Box offers a temperature range of 41‑122°F for $39.99 with a rating of 4.3/5 from 77 reviews. Its bottom‑and‑perimeter heating wires provide even warmth, and the zippered, foldable design simplifies storage when the chamber is not in use.
Alternatively, the Nordic Canyon Bread Proofing Box delivers precise 68‑120°F control and includes a 24‑hour timer for $62.99, rating 4.3/5 from 68 reviews. Its humidity tray helps maintain moisture levels, which is essential for sourdough and yogurt fermentation.
For kombucha or small‑batch wine fermentation, the Hemlock Kombucha Heating Wrap can be wrapped around a 1‑gallon jar. It offers three temperature settings and is safe for use around liquids. Priced at $28.00 with a rating of 4.6/5 from 1,209 reviews, it provides localized heating without heating the entire chamber, conserving energy on warm days.
Connect the proofing box’s power cord to the inverter (if AC) or directly to the battery (if DC). Set the desired temperature according to the fermenting product: 78°F for sourdough, 75°F for kombucha, 70°F for yogurt. Adjust the humidity tray by adding warm water; this raises relative humidity to the optimal 70‑85 % range.
Step 5: Add Fermentation Vessels and Airlocks
Place your dough containers, jars, or carboys inside the chamber. For wine or beer fermentation, the FastRack Fermentation Airlock Set is an inexpensive solution that ensures a sealed environment while allowing carbon dioxide to escape. The set costs $8.95 and holds a 4.6/5 rating from 3,355 reviews.
Insert each airlock into the drilled rubber stopper that fits the mouth of the bottle. The transparent design lets the user monitor bubbling activity without opening the vessel. This system works well with the temperature stability provided by the proofing box or heating wrap.
Arrange the vessels so that air can circulate freely; avoid stacking heavy jars directly on top of the proofing box’s humidity tray to prevent water spillage.
Step 6: Test, Calibrate, and Use the Chamber
Before beginning a full fermentation, perform a 24‑hour test run. Set the proofing box to a target temperature and observe the internal thermometer through the viewing window. Verify that the solar panel maintains battery charge throughout the day; if the battery level drops below 50 % after a full day, consider adding a second panel or increasing battery capacity.
Adjust the humidity tray water level until the built‑in humidity gauge reads within the desired range. For kombucha, a temperature of 78°F with 80 % humidity yields the fastest SCOBY growth. For sourdough, a slightly lower humidity reduces crust formation on the dough surface.
Once the system is calibrated, begin the actual fermentation. Record temperature and humidity data daily to track consistency. Over time, the data will reveal patterns that can be used to fine‑tune the solar setup, such as repositioning the panel for optimal sun exposure.
Tips & Pro Tips
- Use a digital hygrometer with a probe that can be placed inside the chamber without opening the door; this prevents heat loss.
- Apply reflective foil to the interior walls of the enclosure to improve heat distribution and reduce cold spots.
- When using the Hemlock Kombucha Heating Wrap, place a small glass dish of hot water beneath the jar to increase local humidity without affecting the entire chamber.
- Schedule regular battery maintenance checks, including voltage testing and terminal cleaning, to ensure long‑term reliability.
- If the proofing box’s water tray interferes with large containers, position the tray on a lower shelf or use a separate humidity tray that fits the chamber dimensions.
Troubleshooting
Problem: Temperature drops more than 5°F during cloudy days.
Solution: Verify that the solar panel is receiving unobstructed sunlight; clean any dust from the panel surface. If the drop persists, increase battery capacity or add an auxiliary 10‑W panel.
Problem: Humidity gauge reads low despite water tray being full.
Solution: Ensure the water tray is not blocked by a container. Replace the tray with a larger capacity model or add a second tray on the opposite side of the chamber.
Problem: Airlock water level evaporates quickly.
Solution: Seal the chamber more tightly using additional weather‑stripping. Refill the airlock water daily and consider using a larger airlock reservoir.
Conclusion
By following the steps outlined in this guide, one can construct a solar‑powered fermentation chamber that delivers stable temperature and humidity for a variety of fermentations. The integration of a proofing box, heating wrap, and airlock set simplifies control while the solar system reduces operating costs. Consistent results, lower energy consumption, and the satisfaction of a self‑sufficient setup are the primary benefits. Readers are encouraged to experiment with different configurations and share their findings with the home‑brewing community.
Products Mentioned in This Guide
Frequently Asked Questions
What size solar panel is needed for a home fermentation chamber?
A 100‑150 W panel is typically sufficient for a 1‑2 ft³ insulated chamber, depending on climate and usage.
How do I store solar energy for nighttime fermentation?
Connect the panel to a 12 V deep‑cycle battery with a charge controller, then use a DC temperature controller to power the heater or cooler.
Can I use a regular refrigerator as the fermentation chamber?
Yes, repurpose a small fridge, add insulation, and run its compressor off the solar‑battery system for precise temperature control.
What is the best way to maintain humidity inside the chamber?
Place a water tray or a small ultrasonic humidifier inside and monitor with a hygrometer, adjusting via the solar‑powered controller.
How often should I check the battery’s charge level?
Inspect the battery voltage weekly and after cloudy days to ensure enough reserve for continuous temperature regulation.