How to Sanitize Fermentation Equipment Naturally: Effective, Chemical‑Free Methods for Homebrewers
Introduction
Sanitizing fermentation equipment is a critical step that prevents unwanted microorganisms from spoiling a batch. This guide explains how to achieve a thorough, natural sanitation using household items and carefully selected tools. The reader will learn a complete workflow that covers cleaning, sanitizing, and preparation for the next fermentation cycle. By following the procedures, one can maintain consistent flavor, safety, and quality in homemade sauerkraut, kimchi, kombucha, and other fermented beverages.
The methods described avoid harsh chemicals, relying instead on heat, acidity, and oxygen‑based cleaners. Natural sanitation reduces the risk of off‑flavors and is friendly to the environment. In addition, the guide integrates a few well‑reviewed Amazon products that simplify each stage without compromising the natural approach.
What You Will Need
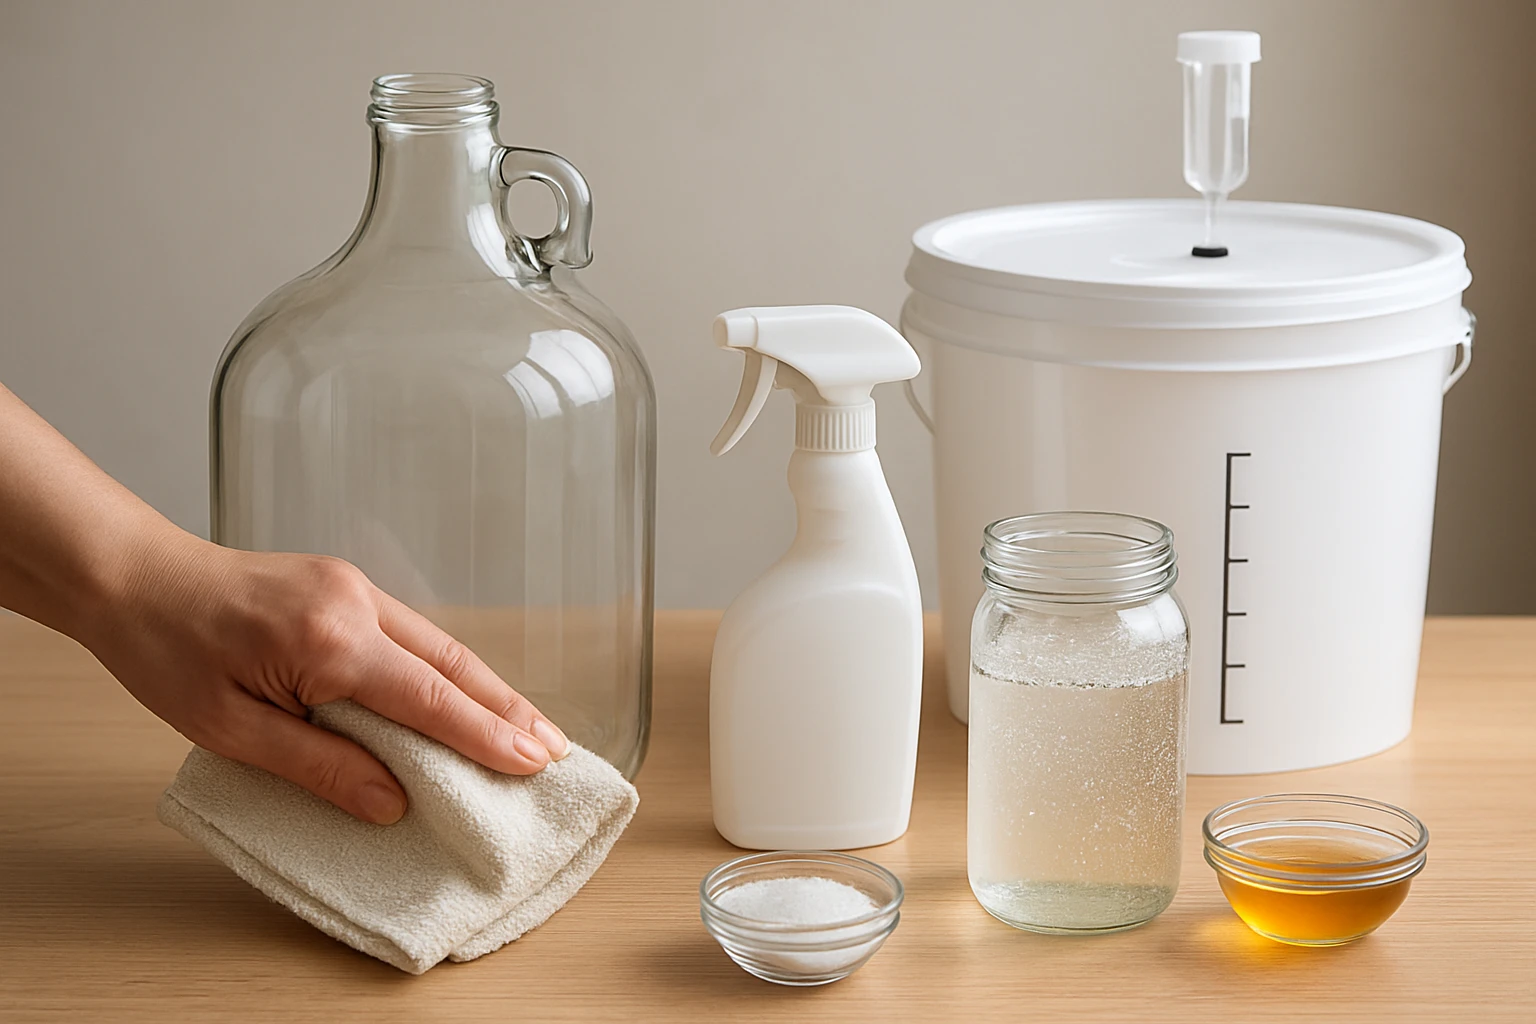
- Large stainless‑steel or glass pot for boiling water
- Food‑grade white vinegar (5 % acidity)
- Clean towels or a food‑grade drying rack
- Non‑abrasive sponge or brush
- Craft A Brew No Rinse Cleanser (optional but highly effective)
- SOLIGT Glass Weights (for post‑sanitization jar setup)
- JOBVERT Fermentation Kit (lids and weights for wide‑mouth jars)
- LELELUK Fermentation Weights (alternative weight set)
- JILLMO Fermentation Lids (airlock lids for sealed fermentations)
Step‑by‑Step Instructions
1. Disassemble and Pre‑Clean All Equipment
The first phase removes visible debris that could shield microorganisms from the sanitizing solution. Remove lids, grommets, airlocks, weights, and any silicone seals from the jars. Rinse each component with warm tap water to loosen stuck particles. Use a non‑abrasive sponge to scrub the interior of jars, ensuring that no residue remains on the glass surface.
This manual cleaning prepares the equipment for the more rigorous sanitizing step. It also allows one to inspect each part for cracks or wear that could compromise the seal during fermentation. If any component shows damage, consider replacing it with a new item from the recommended product list.
2. Prepare a Boiling Water Sanitizer
Boiling water is a universally accepted natural sanitizer because the high temperature destroys bacteria, yeasts, and molds instantly. Fill a large pot with enough water to submerge all jars and accessories. Bring the water to a rolling boil, then reduce the heat to maintain a gentle boil for ten minutes.
While the water heats, one may optionally add a cup of white vinegar to the pot. The acidity of vinegar enhances the antimicrobial effect without leaving harmful residues. After the ten‑minute period, turn off the heat and allow the equipment to remain immersed for an additional five minutes to ensure complete heat transfer.
3. Use an Oxygen‑Based Natural Cleanser (Optional)
For equipment that cannot be fully immersed, such as silicone grommets or delicate airlocks, the Craft A Brew No Rinse Cleanser provides a convenient, chemical‑free alternative. This cleanser releases active oxygen, forming hydrogen peroxide that oxidizes organic matter without leaving toxic residues. The product is rated 4.7 stars by 36 reviewers and costs $19.95, reflecting its premium quality.
To use, dissolve one tablespoon of the cleanser in one gallon of warm water, submerge the small parts for one minute, then remove and let air dry. No rinsing is required because the hydrogen peroxide decomposes into water and oxygen. This step ensures that all components are both clean and sanitized, even if they were not boiled.
4. Rinse Thoroughly and Air‑Dry
After the boiling and optional cleanser steps, rinse each piece with hot, filtered water to remove any lingering vinegar or cleanser residue. Place the items on a clean drying rack or a lint‑free towel. Allow them to air‑dry completely before reassembly; moisture can re‑introduce unwanted microbes.
Drying in a well‑ventilated area reduces the chance of mold growth on the drying surfaces. If time is limited, a food‑grade fan can accelerate the process without contaminating the equipment.
5. Verify Sanitization and Reassemble
Before filling jars with brine and vegetables, perform a quick visual inspection. The glass should appear clear, without water spots or film. A simple test involves sprinkling a few drops of white vinegar onto the surface; if no cloudiness appears, the surface is effectively sanitized.
Now reassemble the fermentation system using the recommended tools. The SOLIGT Glass Weights provide a stable, food‑safe solution for keeping vegetables submerged. Each weight is made of lead‑free glass, non‑porous, and costs $14.99 with a rating of 4.6 stars from over six thousand reviews.
If one prefers a kit that includes both lids and weights, the JOBVERT Fermentation Kit offers two upgraded silicone‑ring lids and two heavy glass weights for 86 mm wide‑mouth jars. Priced at $12.99 and rated 4.2 stars, this kit simplifies the transition from cleaning to fermentation.
For smaller batches, the LELELUK Fermentation Weights are a compact 2‑pack, each weighing 7.1 oz, costing $9.99 and receiving a 4.7‑star rating. Their ergonomic grip makes removal easy, preventing disruption of the fermenting mass.
Finally, the JILLMO Fermentation Lids provide stainless‑steel lids with silicone grommets and BPA‑free airlocks. At $16.99 and a 4.5‑star rating, they are designed for jars ranging from 4 oz to 64 oz, offering a reliable seal for anaerobic fermentations.
Tips & Pro Tips
- Always use fresh, filtered water for boiling; mineral deposits can leave film on glass surfaces.
- When sanitizing multiple jars, arrange them in a single layer in the pot to ensure even heat distribution.
- Store cleaned weights and lids in a sealed, food‑grade container to keep them free from dust between batches.
- For high‑acid fermentations such as kimchi, a brief dip in a 1 % hydrogen peroxide solution can provide an extra safety margin.
- Label each jar with the date of inoculation; this practice helps track fermentation progress and identify any contamination early.
Troubleshooting
Problem: Cloudy water after rinsing the jars.
Solution: Perform an additional rinse with hot distilled water and repeat the air‑dry step. Cloudiness often indicates mineral residue that can be removed with a brief soak in white vinegar.
Problem: Weights sink unevenly, causing vegetables to float.
Solution: Use the SOLIGT Glass Weights or LELELUK Fermentation Weights, which are specifically designed to provide uniform pressure across the surface of the brine.
Conclusion
Sanitizing fermentation equipment naturally combines time‑tested heat methods with modern, oxygen‑based cleansers to protect homebrewed products from contamination. By following the five steps—pre‑cleaning, boiling, optional natural cleanser, thorough rinsing, and verification—one can achieve a reliable, chemical‑free sanitation routine. The recommended tools, such as the SOLIGT Glass Weights and JILLMO Fermentation Lids, enhance efficiency without compromising the natural philosophy. Consistent sanitation leads to flavorful, safe, and repeatable fermentations, encouraging homebrewers to experiment with confidence.
Products Mentioned in This Guide
Frequently Asked Questions
Why choose natural sanitization over chemical cleaners for fermentation gear?
Natural methods leave no chemical residues that could alter flavor or pose health risks, and they’re environmentally friendly.
Can boiling water effectively sanitize fermentation containers?
Yes, boiling water (212 °F/100 °C) for at least 10 minutes kills most microbes without adding chemicals.
How does white vinegar work as a sanitizer?
The acidity of 5 % white vinegar disrupts cell membranes of bacteria and yeasts, making it a safe, food‑grade sanitizer.
Is an oxygen‑based cleaner necessary for home fermentation?
Oxygen‑based cleaners like hydrogen peroxide can be used as a final rinse to ensure sterility, but they’re optional if you boil and acid‑rinse.
What’s the best way to dry sanitized equipment to avoid re‑contamination?
Air‑dry on a food‑grade rack or wipe with a clean, lint‑free towel in a sanitized environment to prevent microbes from settling.