Introduction
This guide explains how to construct low‑energy fermentation chambers that maintain consistent temperatures while minimizing electricity consumption. Readers will learn the scientific principles of temperature control, discover practical design strategies, compare two market‑tested products, and acquire actionable tips for long‑term success. The information is suitable for home brewers, sourdough enthusiasts, and anyone interested in sustainable food preparation.
Background and Context
Fermentation relies on microorganisms that thrive within a narrow temperature band. Yeast, lactic‑acid bacteria, and kombucha SCOBYs each have optimal ranges that affect flavor, texture, and safety. Maintaining those ranges without excessive heating or cooling reduces energy bills and environmental impact.
Traditional solutions such as refrigerator conversion or dedicated climate chambers consume significant power because they lack precise modulation. Modern low‑energy approaches combine insulation, passive heat sources, and smart controllers to achieve stability with a fraction of the load.
Key concepts include thermal mass, heat‑loss coefficients, and the use of temperature‑controlled wraps. Understanding these ideas enables the builder to size components correctly and avoid common pitfalls such as temperature overshoot or condensation.
Design Strategies for Low‑Energy Fermentation Chambers
1. Insulation First
Begin by selecting a container with high R‑value. Expanded polystyrene (EPS) coolers, insulated wine coolers, or repurposed chest freezers provide a solid foundation. Line the interior with reflective foil to reduce radiant heat loss. Seal all seams with weather‑stripping tape to prevent drafts.
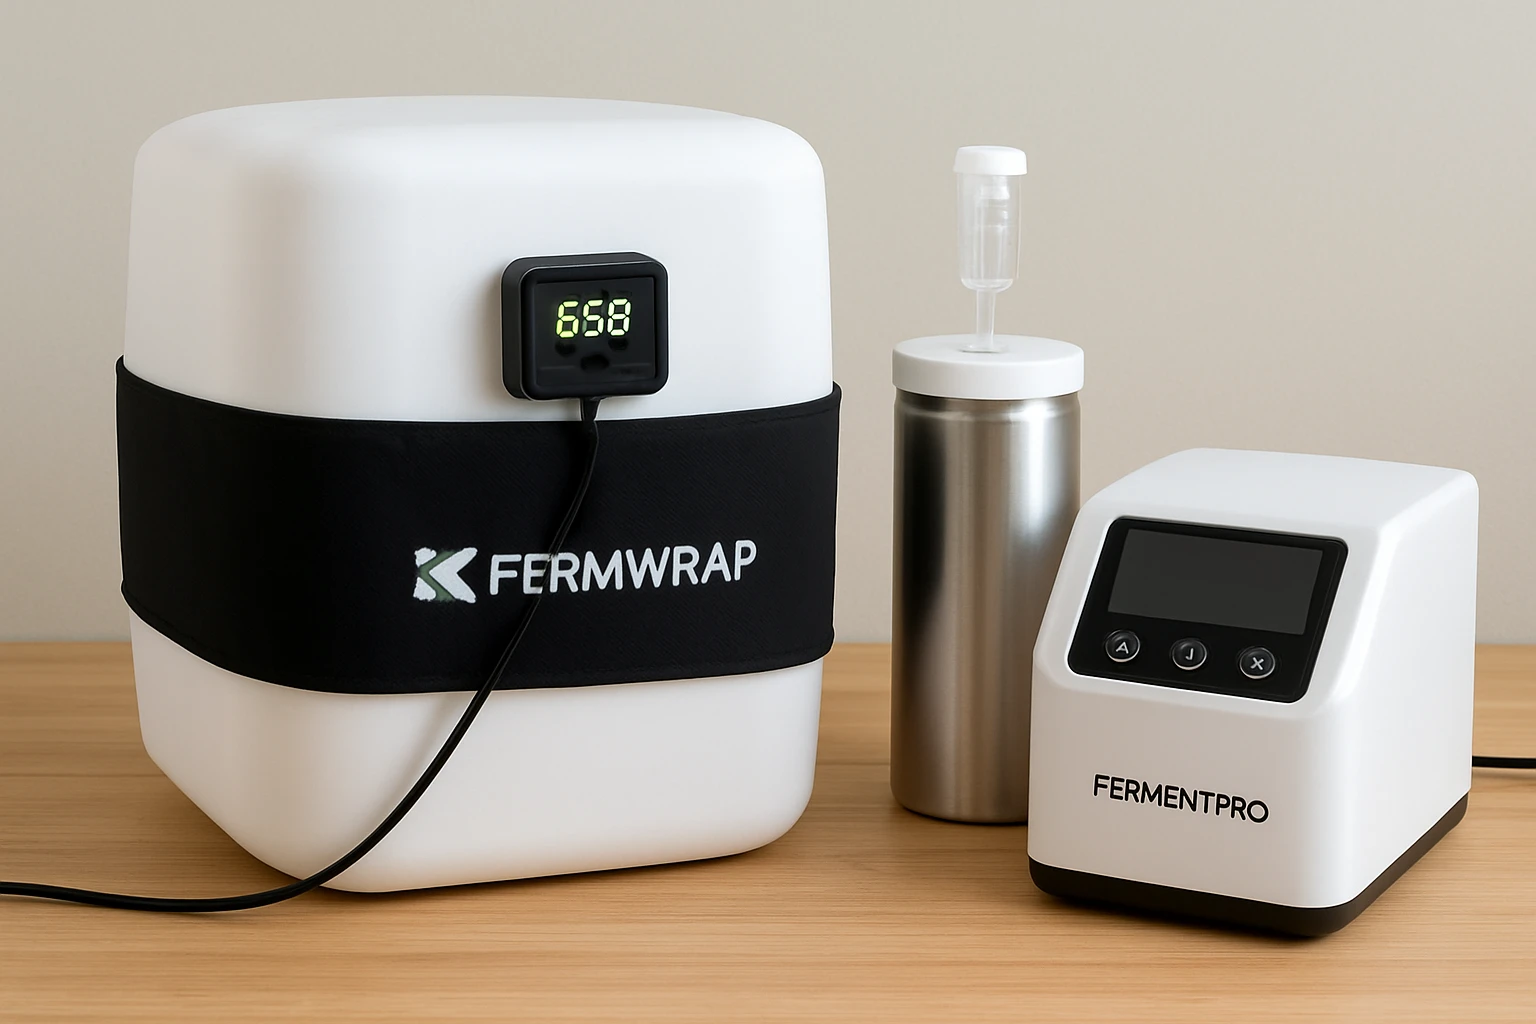
For small batches, a simple cooler combined with a FermWrap Fermentation Heater offers an elegant solution. The heater delivers 40 watts of gentle, even heat across a surface of nearly two square feet, allowing the user to raise ambient temperature by 5‑20 °F depending on insulation quality.
When the ambient environment is colder than the desired fermentation range, the heater can be powered continuously at low wattage, resulting in energy consumption far below that of a full‑size refrigerator compressor.
2. Thermal Mass Integration
Adding water bottles, ceramic tiles, or a sealed bag of sand inside the chamber creates thermal inertia. The mass absorbs heat during the warm phase and releases it slowly, smoothing out temperature fluctuations caused by door openings or brief power interruptions.
Pairing thermal mass with a temperature controller maximizes efficiency. The controller monitors the chamber temperature and activates the heater only when the setpoint drops below the desired range, preventing unnecessary power draw.
Because the FermWrap Fermentation Heater is thin and flexible, it can be wrapped around a water‑filled container, turning the container itself into a heated thermal reservoir.
3. Smart Temperature Control
Modern digital temperature controllers, such as the Inkbird ITC‑308, can be programmed with hysteresis to avoid rapid cycling. Set a target of 70 °F with a ±1 °F tolerance; the controller will power the heater only when the temperature falls below 69 °F and will shut off once it reaches 71 °F.
For users who prefer an all‑in‑one solution, the FermentPro Smart Fermentation Machine integrates heating, cooling, and precise timing. It maintains a range of 50‑115 °F with 5 °F step adjustments, and it can automatically cool after fermentation to prevent over‑fermentation.
The machine’s 12.8 L capacity and clear view window make it suitable for larger batches while still consuming modest power thanks to its efficient thermoelectric system.
4. Passive Cooling Techniques
When ambient temperatures exceed the desired fermentation range, passive cooling can be achieved by placing ice packs or frozen water bottles in a separate compartment of the chamber. The thermal mass absorbs excess heat, and the insulated walls prevent rapid warming.
In a combined system, the FermentPro Smart Fermentation Machine can trigger its built‑in cooling cycle, eliminating the need for external ice packs for most home applications.
By alternating between passive cooling and the machine’s active cooling, users can fine‑tune temperature profiles for temperature‑sensitive fermentations such as sourdough starter development.
Comparison and Selection Guide
Choosing the right product depends on batch size, desired automation level, and budget. The table below contrasts the two featured items across key criteria.
| Feature | FermWrap Fermentation Heater | FermentPro Smart Fermentation Machine |
|---|---|---|
| Power Consumption | 40 W continuous (approx. 1 kWh per 25 h) | Variable; heating up to 350 W, cooling up to 150 W, average < 200 W per cycle |
| Temperature Range | Adds 5‑20 °F to ambient | 50‑115 °F precise control |
| Capacity | Suitable for single carboy or bucket | 12.8 L internal volume, multiple jars |
| User Interface | Requires external controller | Built‑in LCD, preset modes, app guidance |
| Price | $38.35 | $349.99 |
| Rating | 4.4/5 (314 reviews) | 4.6/5 (37 reviews) |
For hobbyists who already own a temperature controller and need only a gentle heat source, the FermWrap heater offers the most cost‑effective path. For users who desire an integrated, set‑and‑forget experience with both heating and cooling, the FermentPro machine justifies its higher price through convenience and precision.
Best Practices and Tips
- Seal the chamber tightly after each opening; even a small gap can increase heat loss by up to 30 %.
- Place the temperature sensor in the center of the fermenting mass, not against the wall, to obtain an accurate reading.
- When using the FermWrap heater, attach it with reusable vinyl tape to avoid adhesive residue and to allow repositioning.
- Calibrate the controller’s hysteresis to a 2 °F band; this reduces cycling and extends the lifespan of heating elements.
- Schedule regular cleaning of the FermentPro machine’s interior to prevent biofilm buildup, which can affect temperature distribution.
- Document each batch’s temperature profile; over time this data helps refine insulation and control settings.
Frequently Asked Questions
- Can I use the FermWrap heater without a separate controller? The heater itself does not contain built‑in temperature regulation, so a dedicated controller is required to avoid overheating.
- Is the FermentPro machine suitable for small 1‑liter jars? Yes; the interior accommodates containers as small as 250 ml, and the view window allows monitoring of any size batch.
- How much electricity will a typical 5‑day kombucha batch consume? Using the FermWrap heater at 40 W for eight hours per day consumes roughly 1.28 kWh, while the FermentPro’s combined heating/cooling cycle averages about 2.5 kWh for the same period.
- Do I need to refrigerate the chamber after fermentation? Passive cooling or the FermentPro’s automatic cooling function can lower the temperature to safe storage levels without a separate refrigerator.
- Can I combine both products in one setup? Absolutely; the FermentPro can handle primary temperature control while the FermWrap provides supplemental heat for larger containers placed inside the chamber.
- What safety features protect against electrical hazards? The FermWrap uses proper electrical clip connections rather than silicone‑sealed joints, reducing risk of short circuits. The FermentPro includes over‑temperature shutoff and insulated wiring.
- Is the FermentPro compatible with smartphone apps? The device ships with a free companion app that offers recipes and guides, but the app does not control the machine; it serves as an informational resource.
Conclusion
Low‑energy fermentation chambers combine sound thermal engineering with smart product choices to deliver consistent results while conserving electricity. By insulating the enclosure, adding thermal mass, and employing precise controllers, home fermenters can achieve professional‑grade temperature stability. The FermWrap Fermentation Heater provides an affordable, flexible heat source for DIY builds, whereas the FermentPro Smart Fermentation Machine delivers an all‑in‑one solution for users who value automation and cooling capability. Applying the best‑practice tips outlined above will ensure reliable fermentations for years to come.
Products Featured in This Guide
FermWrap Fermentation Heater
Price: $38.35 | Rating: 4.4/5 (314 reviews)
Featured for its low power draw (40 W), flexible wrap design, and suitability for DIY insulated chambers.
FermentPro Smart Fermentation Machine
Price: $349.99 | Rating: 4.6/5 (37 reviews)
Featured for its integrated heating and cooling, precise temperature range (50‑115 °F), and large 12.8 L capacity suitable for multi‑batch workflows.
Frequently Asked Questions
What is the optimal temperature range for common fermentations like yeast, sourdough, and kombucha?
Yeast works best between 20‑25 °C, sourdough prefers 24‑28 °C, and kombucha thrives around 25‑30 °C.
How does thermal mass help reduce energy use in a fermentation chamber?
Thermal mass stores heat, smoothing temperature fluctuations so the heater or cooler runs less frequently.
Can I convert a regular refrigerator into a low‑energy fermentation chamber?
Yes, by adding insulation, a smart temperature controller, and a low‑wattage heater you can repurpose a fridge with far lower power draw.
What are the key features to look for when comparing market‑tested low‑energy fermentation units?
Focus on insulation quality, precise temperature control, power consumption (W), and built‑in humidity management.
How often should I calibrate the temperature sensor in a DIY fermentation chamber?
Calibrate the sensor at least once a month or whenever you notice temperature drift to ensure consistent results.