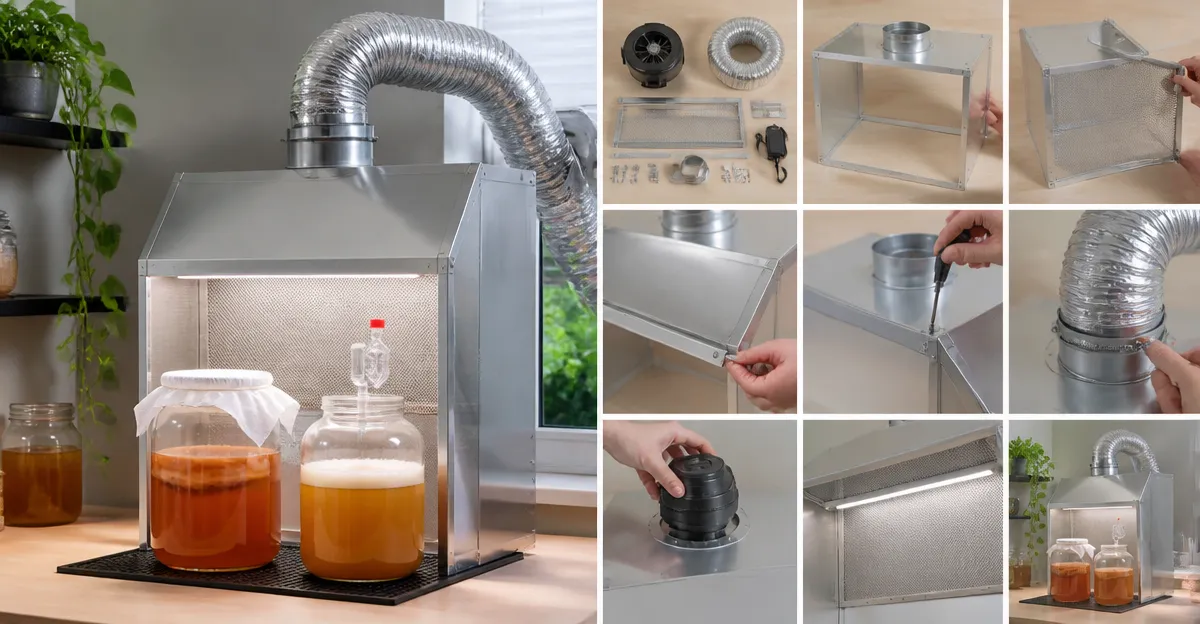
How to Build a Compact Ventilation Hood for Fermentation: Step‑by‑Step DIY Guide for Homebrewers & Kombucha Makers
Introduction
Fermentation processes generate volatile compounds, excess heat, and moisture that can compromise kitchen air quality. A compact ventilation hood removes odors, controls humidity, and protects surrounding equipment, thereby improving both safety and flavor consistency. This guide teaches the reader how to design, construct, and install a small‑scale hood that fits under a standard cabinet while accommodating the unique needs of brewing and kombucha production. By following each step, one will gain a functional system without excessive cost or professional installation.
What You'll Need
The following materials and tools are recommended; each item can be sourced from Amazon using the links provided. One may substitute comparable items, but the listed products have been selected for their proven performance, price, and positive customer sentiment.
- Compact range hood unit (first mention below)
- Metal framing material (e.g., 1‑inch square steel tubing)
- Sheet metal for custom vent covers
- Electrical wiring, wire nuts, and a junction box
- Mounting screws, drill, and screwdriver set
- Silicone sealant and insulation tape
- Carbon or aluminum grease filters (often included with the hood)
- Safety glasses and ear protection
Step‑by‑Step Instructions
1. Define the Ventilation Layout
Begin by measuring the width of the fermentation vessel area and the available cabinet space. The hood should extend the full 30‑inch width of a standard under‑cabinet opening to ensure uniform airflow across the surface of the fermenter. Sketch a simple diagram indicating the location of the fan, filter, and duct (if ducted). This planning stage prevents later misalignment and reduces the need for costly rework.
For most homebrew setups, a ductless configuration is sufficient because the primary goal is odor removal rather than exhaust to the exterior. However, if the kitchen lacks adequate make‑up air, a ducted option will improve performance. The FIREGAS 30" Range Hood offers a convertible design that supports both ducted and ductless operation, making it ideal for this flexible approach.
Why this product? It delivers 300 CFM airflow, features a stainless‑steel construction for durability, and includes a 2‑speed fan with LED illumination. At $65.69 it ranks 4.5/5 stars from 1,993 reviews, indicating reliable performance in small kitchens and apartments.
2. Acquire and Prepare the Hood Unit
Unbox the hood and verify that all components are present: the fan assembly, aluminum filter, mounting brackets, and instruction manual. The FIREGAS unit arrives hard‑wired without a plug, which is advantageous for permanent installation under a cabinet. If a plug‑in solution is preferred, a compatible power cord kit can be purchased separately.
Inspect the multi‑layer aluminum filter; it captures grease and should be cleaned before first use. The carbon pad, sold separately (Model FGS‑TF39‑LW), can be added later if a ductless configuration is chosen, providing additional odor absorption.
Secure the fan housing to a temporary workbench using the supplied brackets. This step allows safe access to the rocker controls and LED light during testing.
3. Build the Supporting Frame
Cut the steel tubing to match the width of the cabinet opening (approximately 30 inches) and to a height that provides at least 4‑5 inches of clearance above the fermenter. Weld or bolt the pieces into a rectangular frame, ensuring all joints are square. The frame will bear the weight of the hood, which is roughly 7‑8 pounds, and must resist vibration caused by the fan.
Attach a sheet‑metal backplate to the frame; this plate will serve as a mounting surface for the hood and also help seal any gaps. Use silicone sealant along the edges to prevent air leakage, which could reduce suction efficiency.
When constructing the frame, consider the location of existing wiring. The fire‑rated junction box should be installed within the cabinet cavity, and the wiring must comply with local electrical codes.
4. Install the Fan and Filters
Position the FIREGAS hood onto the prepared frame, aligning the mounting holes with the pre‑drilled slots in the backplate. Secure the unit with the supplied screws, tightening them evenly to avoid warping the housing.
Insert the aluminum grease filter into the designated slot. For ductless operation, attach the optional carbon filter (Model FGS‑TF39‑LW) behind the aluminum filter; this combination maximizes odor capture while maintaining airflow. The carbon filter is replaceable and should be changed every 3‑4 months for optimal performance.
Verify that the rocker control panel faces outward for convenient operation during fermentation cycles. The LED light, though modest at 2W, provides sufficient illumination for monitoring bubbling activity without generating excess heat.
5. Wire the Electrical Components
Turn off power at the circuit breaker before handling any wiring. Run a 14‑gauge wire from the junction box to the hood's hard‑wired terminals, matching black to black (hot), white to white (neutral), and green to the grounding screw. Use wire nuts and electrical tape to secure connections, then install the junction box cover.
If a plug‑in configuration is desired, purchase a compatible cord kit and connect the wires to the cord's terminals, following the manufacturer's wiring diagram. The FIREGAS hood operates on standard 120‑V household current and consumes less than 45 dB of noise at high speed, making it suitable for residential environments.
After wiring, restore power and test the fan at both low and high speeds. Ensure the LED illuminates and that the rocker switches respond smoothly. A quiet, steady airflow indicates a successful installation.
6. Mount the Hood Under the Cabinet
Lift the assembled hood into position beneath the cabinet, aligning the mounting brackets with the pre‑drilled holes in the frame. The slim profile (4.7 inches high) allows it to fit comfortably even in tight spaces typical of condos and apartments.
Secure the hood to the cabinet using the supplied screws; two screws per side provide adequate support. If the cabinet material is thin, consider adding a reinforcing backplate to distribute load and prevent pull‑out.
Finally, attach the vent outlet. For ducted installation, connect a 4‑inch flexible duct to the rear vent and route it to an exterior vent cap. For ductless operation, simply place the carbon filter and ensure the rear vent is sealed with a vent cover to direct airflow back into the kitchen.
7. Test Performance and Adjust
Place a fermentation vessel on the stove or countertop beneath the hood and start a short brew cycle. Observe the airflow pattern by holding a lightweight paper near the vent; it should be drawn upward and outward without turbulence. Adjust the fan speed to maintain a steady 200‑300 CFM flow, which is sufficient to remove CO₂ and volatile acids generated during fermentation.
If the hood feels noisy, verify that all screws are tightened and that the fan is mounted on a vibration‑isolating rubber pad (available separately). Excess vibration can amplify sound and reduce the lifespan of the motor.
Document the fan speed settings that provide optimal odor control without over‑drying the ambient air. This information will be useful for future batches and for troubleshooting any changes in performance.
Tips & Pro Tips
- Use a digital anemometer to measure actual airflow; aim for at least 250 CFM for a 30‑inch hood during active fermentation.
- Install a small hygrometer near the fermenter; maintaining relative humidity between 45‑55% prevents mold growth on the vessel.
- Consider adding a secondary carbon filter (e.g., the replaceable filter sold with the FIREGAS unit) if odors become persistent over multiple batches. li>When routing a duct, keep bends to a minimum; each 90‑degree turn reduces airflow by approximately 10%.
- Label the rocker switches with “Low” and “High” using heat‑resistant stickers to avoid confusion during long fermentation periods.
Troubleshooting
Problem: Fan does not start or runs intermittently.
Solution: Verify that the power connection is secure, check the circuit breaker, and ensure the wiring polarity matches the hood's terminals. Replace the fan motor only after confirming that the control board receives proper voltage.
Problem: Excessive noise (>55 dB) at high speed.
Solution: Tighten all mounting screws, add vibration‑absorbing pads, and clean the fan blades of any debris that may cause imbalance.
Problem: Odor persists despite using the carbon filter.
Solution: Replace the carbon filter, increase fan speed during peak fermentation, and ensure the vent outlet is not obstructed by furniture or cabinets.
Conclusion
By following this guide, one can construct a compact, efficient ventilation hood that safeguards kitchen air quality during home brewing and kombucha fermentation. The combination of a convertible range hood, proper framing, and thoughtful wiring creates a reliable system that can be adapted to both ducted and ductless environments. Regular maintenance of filters and periodic performance checks will extend the lifespan of the hood and preserve the integrity of every batch.
One is encouraged to experiment with fan speeds and filter types to fine‑tune the setup for specific recipes. With a modest investment of under $70 for the core hood unit, the DIY solution offers professional‑grade ventilation without the expense of a commercial exhaust system.
Products Mentioned in This Guide
Frequently Asked Questions
What size ventilation hood is suitable for a home fermentation setup?
A compact hood that fits under a standard cabinet—typically 24" wide, 12" deep, and 6" high—provides enough airflow without taking up extra space.
Can I use a regular kitchen range hood for fermentation?
Yes, a small range hood with adjustable fan speed works well, as long as it can be mounted low and vented outside or through a filtered recirculation system.
What type of fan speed is recommended to control odors and humidity?
A fan that delivers 100–150 CFM at low speed and up to 300 CFM on high offers flexible control for different fermentation volumes.
Do I need a carbon filter if I vent the hood outside?
No, an external vent eliminates the need for a carbon filter; a filter is only necessary for recirculating setups to trap odors.
How often should I clean the metal framing and vent covers?
Clean the hood and vent covers every 2–4 weeks to prevent mold and residue buildup, using mild detergent and a soft brush.