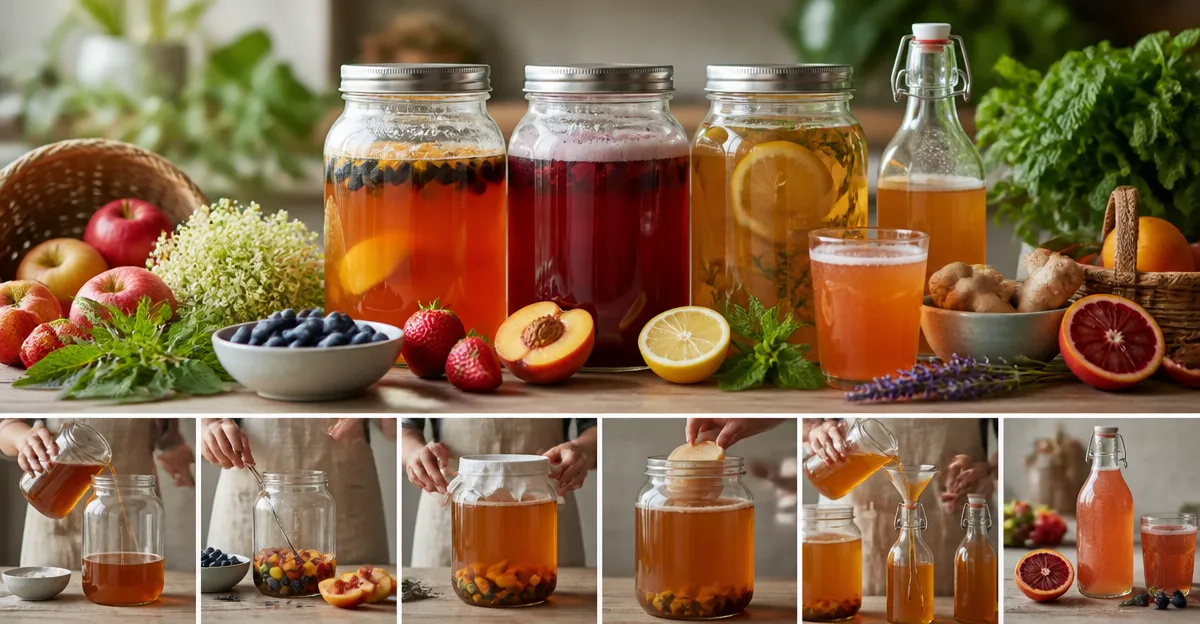
How to Craft Seasonal Kombucha Flavors with Local Produce: Step-by-Step Guide & Recipes
Introduction
In this guide the reader will learn how to transform a basic kombucha brew into a series of seasonal flavor experiences using fresh, locally sourced fruits and herbs. The process combines the science of fermentation with the art of seasonal cooking, resulting in a probiotic beverage that reflects the character of each harvest. By following the step‑by‑step instructions one can create balanced, effervescent drinks while reducing waste and supporting local agriculture. The guide also highlights tools that simplify each stage, allowing both beginners and experienced brewers to achieve consistent results.
What You'll Need
The essential materials for a successful seasonal kombucha project are listed below. Each item includes a brief description and a direct link to a recommended Amazon product.
- The Kombucha Shop Starter Kit – complete 1‑gallon brewing system with glass jar, SCOBY, starter liquid, pH strips, and temperature gauge (price $54.99, rating 4.7/5).
- Urban Kitchen Kombucha Starter Kit – organic SCOBY and ingredients in a sturdy glass jar (price $39.99, rating 4.6/5).
- Urban Kitchen Organic SCOBY Kit – standalone SCOBY pouch for existing brewers (price $13.49, rating 4.3/5).
- Fermentaholics Kombucha Essentials Kit – budget‑friendly kit with glass jar, SCOBY, thermometer and pH strips (price $36.99, rating 4.6/5).
- Fermentaholics Kombucha Starter Kit – premium kit with organic SCOBY, tea blend and detailed instructions (price $41.99, rating 4.5/5).
Additional household items such as a large stainless steel pot, fine mesh strainer, funnel, and clean glass bottles are also required, but these are typically available in most kitchens.
Step 1: Prepare the Sweet Tea Base
The first fermentation begins with a sweetened tea that will feed the SCOBY. Bring one gallon of filtered water to a boil, then remove from heat and add four organic tea bags or loose‑leaf tea. Stir in one cup of organic cane sugar until fully dissolved, then allow the tea to cool to between 75 and 85 degrees Fahrenheit. Cooling is essential because temperatures above 90 degrees can damage the delicate culture, while temperatures below 70 may slow fermentation. Once the tea has reached the appropriate temperature, pour it into the glass jar supplied with The Kombucha Shop Starter Kit and add the starter liquid and SCOBY.
- Why this kit? The included thick American glass jar prevents breakage, while the pH test strips and adhesive temperature gauge enable precise monitoring of the brew.
- Price: $54.99; Rating: 4.7/5.
Step 2: Primary Fermentation (First Week)
Cover the jar with the breathable cloth provided in the kit and secure it with the rubber band. Place the jar in a dark, temperature‑stable location such as a pantry or cabinet, away from direct sunlight. Allow the mixture to ferment for seven to ten days, checking the pH daily with the supplied strips; a pH between 2.5 and 3.5 indicates a successful fermentation. During this period the SCOBY will form a new layer on the surface, converting sugars into organic acids, carbon dioxide and trace amounts of alcohol. If the brew develops an off‑smell or mold, discard it and start over with a fresh SCOBY.
- Why the breathable cover? It supplies oxygen for the aerobic culture while keeping insects out, which is a feature of both the Fermentaholics Kombucha Essentials Kit and the Fermentaholics Kombucha Starter Kit.
- Price: $36.99 (Essentials) / $41.99 (Starter); Ratings: 4.6/5 and 4.5/5 respectively.
Step 3: Harvest the Base Kombucha
After the primary fermentation, remove the SCOBY with clean hands and set it aside in a small jar with a cup of fresh kombucha to keep it hydrated. Using a fine mesh strainer, pour the fermented tea into a clean container, discarding any sediment that has settled at the bottom. This clear liquid is now ready for secondary fermentation, where seasonal fruits, herbs, or vegetables will impart flavor and aroma. Preserve a small amount of the base kombucha (approximately one cup per gallon) to use as starter liquid for the next batch.
- Why keep starter liquid? It ensures the next brew begins with an active culture, reducing the risk of contamination.
- Using the Urban Kitchen Organic SCOBY Kit is ideal for those who already own a jar, as it supplies a high‑quality SCOBY without duplicate equipment.
- Price: $13.49; Rating: 4.3/5.
Step 4: Prepare Seasonal Flavor Add‑Ins
Select produce that is at its peak in the current season; for spring consider strawberries, rhubarb, and mint, while summer offers peaches, blueberries, and basil. Wash the fruit thoroughly, remove any stems or pits, and cut into bite‑size pieces. For herbs, gently bruise the leaves to release essential oils. Place the prepared ingredients into clean glass bottles or flip‑top containers, then fill each bottle with the base kombucha, leaving about one inch of headspace. Seal the bottles tightly to trap carbon dioxide generated during the second fermentation.
- Why use glass bottles? Glass does not react with the acidic kombucha, preserving flavor integrity, a benefit emphasized by the The Kombucha Shop Starter Kit which includes a gallon‑size glass jar for this purpose.
- Optional tools such as the OXO Good Grips 3‑Inch Mini Strainer (not listed) can aid in filtering fruit particles before bottling.
Step 5: Secondary Fermentation (Flavor Development)
Store the sealed bottles at room temperature for two to five days, depending on the desired level of carbonation and flavor intensity. Check the bottles daily by gently pressing the sides; increased firmness indicates rising carbonation. When the desired fizz is achieved, transfer the bottles to the refrigerator to halt fermentation and preserve the fresh fruit notes. Refrigeration also reduces the risk of over‑carbonation, which can cause bottles to burst.
- Why refrigerate promptly? Cold temperatures slow yeast activity, stabilizing the flavor profile and ensuring safety.
- The temperature gauge from The Kombucha Shop Starter Kit can be used to verify that the bottles remain within a safe range during the secondary phase.
Tips & Pro Tips
- Always use organic, locally sourced produce to minimize pesticide residues and to enhance the natural aroma of the kombucha.
- For clearer kombucha, add a small amount of activated charcoal during the primary fermentation and filter it out before bottling.
- Experiment with spice blends such as ginger, cinnamon, or cardamom; add them in a muslin bag for easy removal.
- Maintain a fermentation log in the notebook printed on the Fermentaholics Kombucha Starter Kit jar; recording dates, temperatures, and flavor notes helps refine future batches.
Troubleshooting
| Problem | Possible Cause | Solution |
|---|---|---|
| Flat or weak carbonation | Insufficient yeast activity or low temperature | Increase room temperature to 78°F and ensure the bottles are tightly sealed. |
| Mold on SCOBY | Contamination from dirty equipment | Sanitize all glassware with boiling water and start a new batch with fresh starter liquid. |
| Overly sour taste | Excessive fermentation time | Reduce secondary fermentation period and refrigerate sooner. |
Conclusion
This guide has demonstrated how to create seasonal kombucha flavors by pairing a robust base brew with fresh, local produce. By following the numbered steps, monitoring temperature and pH, and employing the recommended tools, one can produce a probiotic beverage that celebrates the bounty of each season. The process encourages experimentation, supports sustainable food practices, and offers a rewarding hands‑on experience for anyone interested in fermentation. Continue to explore new fruit combinations, keep detailed notes, and share the results with friends and family.
Products Mentioned in This Guide
Frequently Asked Questions
What is the best way to incorporate fresh, local produce into kombucha flavoring?
Add the washed, chopped fruit or herbs to the secondary fermentation jar and let it ferment for 2‑5 days, adjusting time for desired intensity.
Do I need to adjust the sugar content when using seasonal fruits?
No, keep the original sugar level for the primary brew; the fruit’s natural sugars will enhance flavor during secondary fermentation.
How can I prevent mold when brewing seasonal kombucha?
Maintain a clean environment, use a tight‑fitting cloth cover, and keep the fermentation temperature between 68‑78°F (20‑26°C).
Can I reuse the same SCOBY for multiple seasonal batches?
Yes, a healthy SCOBY can be reused indefinitely as long as you store it in fresh starter tea between batches.
What tools help achieve consistent seasonal kombucha results?
A pH strip, temperature gauge, and a glass jar with an airtight lid simplify monitoring acidity and carbonation for repeatable flavors.